2018 Update — Originally Version Published December 26, 2011
One of the things I think always makes a home look beautiful is trim work.
It’s all about personal taste, of course – but I find the classic look of decorative carpentry design with rosettes, fluted casings and shadow boxes/wall frames always seem to carry a certain elegance, and when you have kids running around the house you absolutely have to temper this with low-maintenance design considerations as well. This project took a few weeks, but realistically the time required was about 5-7 hours each weekend for about a month. I went with white shadow boxes all sealed with 3 coats of high-quality semi-gloss paint. The single color and high gloss finish assure ease of maintenance.
And tool-wise, there’s lots of fun to be had with your nail gun and miter saw. (Two of my favorite work shop tools!)
Need to hire a local interior carpentry/trim work professional? Get free estimates online from top pros in your area!
Just one warning: This is a project for the patient – you do *not* want to rush and the more meticulous you are, the better. I had to drink a LOT of coffee to stay focused.
Naturally, you don’t need to do the construction yourself either – you can always find a local contractor to help. But even if you do hire someone, it’s always best to know what the job entails.
In the summary that follows, I’ll describe the design considerations and try my best to show the project preparation and construction steps as clearly as possible with many photos. I’ll also provide specific links to tools and materials that I used myself (or that I regard highly) to try to take all the mystery out of this. Every project is somewhat different, of course, but this type of work is incredibly gratifying and can truly change the whole “feel” of your home.
Molding Design First
Before beginning any construction, you absolutely need to have an end-vision in mind – which, personally, I often find particularly challenging. But that being said, let me start with three photos of the finished entrance and stairway.
Stairway Trim Molding & Shadow Box Ideas
I’m happy to say, this was precisely the end-look I sought out to achieve, after much research and consultation with my wife, naturally…
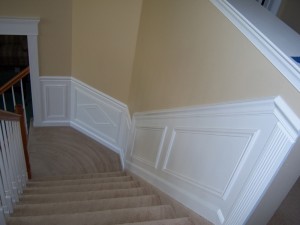
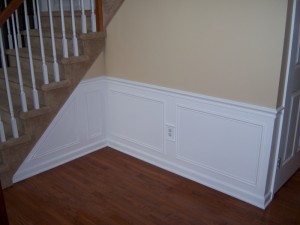
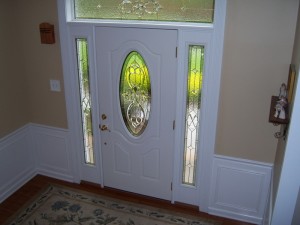
Look around on-line for more ideas, and it’s well-worth investing in a few high-end/glossy books as well: they’re not terribly expensive and can give some truly terrific insights. You’ll know what you like when you spot it. I used two of the following three myself:
- Trimwork: Ideas & How-To (Better Homes & Gardens)
- Architectural Trim: Ideas, Inspiration & Practical Advice
- 1001 Ideas for Trimwork
Shadow Box Construction
To start bringing your design to life, you now get to draw on your walls – which frankly, I really enjoy.
I began with a level line (be sure to use a high-end carpenter’s level) at 28″ spanning all horizontal areas. On the stairs, you need to measure up at various points, and draw a solid line which will ultimately be parallel to the rise of the stairs
Once you have the top of your work-area marked-out (which for me denotes bottom of the upper chair rail), get your stud-finder and mark out vertical lines clearly indicating each of the studs. Be careful to note the spacing; it should be pretty uniform – with extra studs in corners and near doorways. If something jumps out as “breaking this pattern,” it’s possible you’ve detected a pipe – and you have to be VERY careful not to put a nail into a pipe.
Call me anal-retentive if you like, but I drilled a 1/8-inch pilot hole (very carefully) where I expected each stud to be. When I hit wood, I knew I was Okay. If you expand the picture below, you’ll get a closer look at all of the markings…
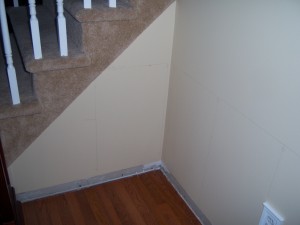
Regarding base moldings – I chose to rip my old ones off the walls. You don’t have to do this, but I wanted a high base molding. So, above you can see a work area with the top line, the stud mark-outs and the base moldings removed.
After getting this all marked out and cleaned up (removing the base moldings will make a pretty big mess), it’s almost time to start construction.
But there’s some additional preparation that really should be done beforehand if at all possible…
Need to hire a local interior carpentry/trim work professional? Get free estimates online from top pros in your area!
When you purchase your material, you’ll have some or all of the following: base molding (which sits on the floor), cap molding (which builds out the bottom of the base molding), chair rail (which I used for the top) and then there’s the more specialized trim you buy to actually create your boxes and/or designs.
The main point: Once you have all of your materials at home and you know what’s going where – consider giving the top and bottom moldings two coats of paint before even starting to cut. It just makes the later painting a lot easier, where you’ll be worried about hitting the painted wall at the top and the flooring at the bottom.
Building My Hall & Stairway Shadow Box Design
It’s now time to get out your miter saw and start making some very precise cuts.
Can you use a miter box? I guess so, but this is going to be a highly aesthetic project in the end – and you really want your cuts to be as precise as possible.
That said, I strongly recommend using a truly high-quality miter saw if at all possible; the whole experience will simply be much better – and the outcome as well. Cut in your base moldings and the top moldings – essentially framing-out the work space. I used a Porter-Cable 16 gauge finish nailer with 2-inch nails to attach to the studs, but you can also use a hammer and regular finishing nails – being sure to countersink each one. A finish nailer is one of those tools that can save you hours of tedious work, and it’s frankly an absolute blast to use.
I also applied a thin bead of caulk to the back of each piece to really hold tight to the walls. This is particularly important if your walls aren’t perfectly straight… like mine.

The stairs are definitely trickier than the horizontal areas – but again, just be as meticulous as possible and definitely don’t rush. If something comes out sloppy, rip it off and do it again.
Each of the countersinks should be filled with wood filler, and the miters should be finished this way as well. DO NOT use caulk for this as it will shrink. Use wood filler and sand it down after it dries to get the most precise look you can. It’s the details that make this project really come out nice.
Once all is framed out, it’s time to draw on the walls again – this time marking out guidelines for each of your boxes and perhaps even some fancier designs you may want to add. You’ll see for the stairs, I even outlined these boxes with masking tape. I wanted to be 100% sure I knew what this would look like when finished before I started the more complex cuts.
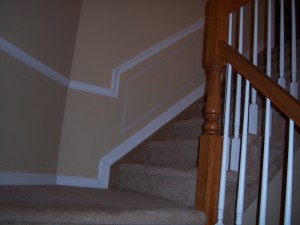
Now, the mitering gets really interesting – especially on the stairs. If you think stairs should be at a 45-degree angle, think again. Get a protractor and check explicitly. In my case, it was pretty close, but if memory serves, I had to deal with 41.5-degrees or something similarly ugly. Furthermore, the joints shown on the rise of the stairs are formed by both pieces of wood, each mitered partially. It’s tricky.
The way to do this is by testing on scraps and seeing how they line up on your guide lines. When you’re confident you have the miter saw set up properly, then make the real cuts and attach the moldings to the wall. Nail and sparsely caulk behind as before; if any caulk oozes out clean it meticulously.
Use wood filler on the nail holes and miters as necessary – and sand afterwards as well.
The following video shows the construction of a single shadow box, shot in my dining room – the miters are simpler (as it’s a nice rectangle), but the installation steps are identical:
I chose to do something a little fancy in a central box on the stairs.
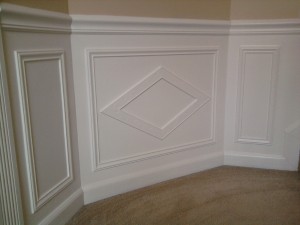
You can see how I did this design – right on the wall again, and after the main boxes were all in place. To me, you need to be careful about overdoing it – but dressing up one focal area can really come out nice. There are accents (fancy wood designs) you can buy – but I chose to make a diamond out of a nice piece of decorative molding myself. This one diamond, designing and cutting – I would say easily took 2+ hours alone. (There’s actually a design etched into it and this had to match up as well.)
This is very slow and careful work!
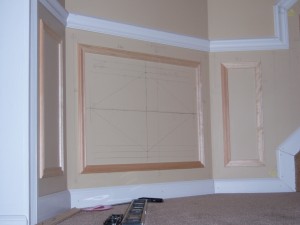
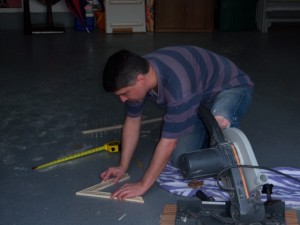
When everything is finally on the walls, there’s one more step that I think makes a big difference. Don’t skip this. Get a brand new tube of caulk, cut the tip very fine and very carefully run a bead all along every piece of molding where it meets the wall. This really brings everything together, even though it seems very subtle. It essentially changes the work area from wood-on-walls to almost what appears to be a “custom paneling.” Not quite wainscoting, but a nice tight homogeneous look.
Trim Work Painting & Finishing Touches
Now, you’re finally ready to start the final painting – you can see a nice shot of the stairway work below right at this stage. Applying three coats of high-quality semi-gloss white paint is really no fun at all (at least not to me), but the finished project will make it worth it – and this is the home stretch.
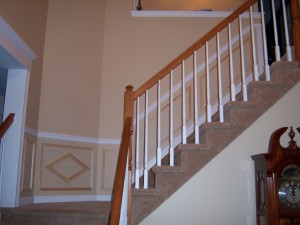
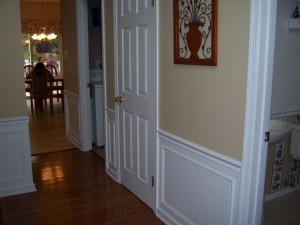
Below are a few additional shots of some of the other final areas. These are worth a close look-over and as you really study the details of your project some of the other nuances you may notice:
- I added vertical fluted casing borders at the top of the stairs and entrance to the kitchen; I thought this sectioned-off those end-areas nicely.
- Having a coping saw handy is very useful for the base and cap moldings as you come to the corners of adjacent rooms. You may need to get creative here.
- You may find a chair rail, cap molding or base molding section sticks out a bit further when butt-up against an existing molding. (For example, this will almost surely be the case with your cap moldings when meeting up with existing doorway casings.) Miter the new moldings at 45-degrees to interface cleanly. In reality, this is a “fix” – but frankly I think it looks great. Look carefully at the first picture just below, and you’ll see clear examples of this…


I’d be particularly interested to hear any comments or thoughts on this topic – as some folks are true artists when it comes to decorative trim work, shadow boxes, wainscoting & pilasters. This is one of those areas where you’re truly limited only by imagination and creativity. Even the color schemes can be amazingly elaborate.
Any other shadow box ideas or trim work design suggestions that anyone can share below?

Hi Mark…Super work and detail. I’m doing a similar job repainting entire house and adding chair rails and shadow boxes. I’m now at my stairs and thought I knew what I’d do there. Angles don’t worry me (have a math background) and have gotten comfortable with my miter saw so good there. What confused me was that I was ready to use the template (pre-cut 2×4 by 28″) I’ve used so far for level surfaces which gives me standardized distance between bottom of the chair rail to the top of the baseboard. So far so good. But when I used my template on the stair I realized I had two ways I could go. Do I measure with my template vertical or do I measure with my template flush with the angled baseboard on the stairs. The first way assures the vertical length (height) of the shadow boxes on the stairs will have same vertical length as the boxes in the rest of house. The second assures the distance between the horizontal pieces (those parallel to the baseboard) will have the same distance as shadow boxes in rest of the house. The first gives a narrower set of boxes and the second a wider set. Think either would look good but wonder how you approached this decision. BTW, as you’ve done plan on all white semi-white below the chair rails…Sorry for being so late to the party and thanks in advance for any advise you can share…
Hey Phil – Very interesting question! I didn’t use a template as you’re describing here, but I definitely see your dilemma. I have a math background as well, and jobs like this one are surprisingly mathematical. The way I would address this is “empirically.” In short, I would suggest putting the template aside for a bit an using some masking tape, perhaps 2 colors of such tape, literally lay out each of the 2 possible deigns on your stairway walls. Then step back and literally look both – picking the one that you feel is best. In this way, you’re working from what you see – a real layout. No guesswork as to the aesthetics. Do you see what I mean?? Would be most curious to hear how you make out!
Hi Mark,
What is the paint color you used on the walls?
Hi Priya – I’m using Benjamin Moore’s Semi-Gloss Super White.
Hello Mark – I found you on You-Tube and was I floored with your work detail in your home….I’m on my way to making doing some upgrades in our new home. What do you suggest that I start with – chair rail or the shadow boxes?
Hi Mimi –
Thanks for the kind words; that’s very nice of you to say – especially as I’m about to spread 5 yards of black dyed mulch in my yard and it’s going be about 90-degrees. I needed the motivation – so thanks again! My suggestion is that you find a small room or work area, do a design in total and build it up piece-by-piece. Perhaps start with base moldings. Or chair rail. But make each piece of the design stand-alone; allowing various plateaus of apparent-completion. I did this with a basement stairwell with trim work. I also did it with a small powder room with wallpaper, crown moldings, marble flooring, chair rail and a new toilet. In general, I like to find a place I can try things out, build things up incrementally, make mistakes – and then take what I’ve learned (in aggregate) to the more prominent areas. Hope this helps, and best of luck to you!
Hi Mark,
great work!
can you tell me what kind and size of moulding you use for the boxes? is there a name to the type of moulding? I can’t find moulding that looks like what you used.
thanks
Lise
Hi Lise – and thanks! I used a 1-1/4″ x 3/8″ hardwood panel molding for the boxes, and it was a stock item from a local hardware store. I would suggest taking a photo from the site to a store near your home, and I bet they can help immediately. The molding you find may not be identical, but I’m sure you’ll find something comparable… and maybe even more interesting? Best of luck to you!
Mark,
Did you use semi-gloss white for everything under the chair rail or is it a combo of semi gloss and matte paint?
Jean
It’s all semi-gloss, Jean. In fact, I did some touch-ups just a few days ago, which is why I like the easy-maintenance single-color semi-gloss. Now, I will add that even the semi-gloss won’t stop very cute [but highly destructive] Yorkie puppy, though. Yep – our new addition has decided that he likes chewing on my trim work. Cute, tiny, adorable – but ever-so-slightly evil?? ;-)
Hi Mark, we are planning a similar project for our entryway and up our front stairway. However, we have a handrail along the wall that extends up the stairs, attaching at the top to the railing (not the wall). We would like your opinion on spacing. We’re thinking of putting a piece of moulding above handrail, but don’t want it to interfere with grasping the handrail.
Hey Lisa – Two pictures may help. The first is just below the text of this comment. This is a shot I took of a different stairway I did, and this one has hand rail. (I actually installed the hand rail myself, while it sounds like you’re trying to accommodate an existing rail.) You can see here I have a piece of molding slightly above the hand rail – much like you describe if I’m interpreting your description correctly. The top of the top molding (chair rail) is at about 31 inches, and given that the rail is extended a couple of inches from the wall it works just fine.
The second picture is below in another reader comment by Kevin dated April 23, 2013. He went with the molding *below* the hand rail. So, you can see how this scenario may work out as well.
Do either of these shots help to clarify which design might perhaps work best for you?
Thanks Mark, I think we’ll go with the ‘Kevin’ version, just to be sure the molding surrounding the hand rail does not interfere with using the railing. We’ll post some pictures!
Excellent – Glad those shots helped with your decision. And I’d be more than happy to post your photos right within this comment thread when you guys are done. Use the Contact Page (to include the photos as attachments) whenever you’re ready. Meanwhile – have fun!
Mark-
Need some help, how did u figure out your angles on the shadow boxes on the steps, as there are two different cuts for those angled boxes as opposed to a typical 45 degree box? Also what was the angle 67 degrees, and how did you cut those angles as my compound saw can’t cut those angles
I am currently doing this in my house and looks very similar to your home, and I’m stuck on the two cuts on my steps..help
Matthew
Hi Matthew – The angle cuts on the stairs are definitely tricky…
Here are some of the things I did that may help:
1) To measure the angle of the stair-section rise, you can use a level along with a protractor. As I recall, one section that I expected to rise at 45-degrees actually did so at about 41-degrees.
2) Use your carpenter’s level to create ‘truly’ vertical guidelines on the walls where the stairs rise.
3) Then follow the angle of the rise to complete the shadow box templates – to your liking.
4) Mark all of this our with masking tape (or the like) as I show in one of the photos above to be *really* sure this looks the way you want. You can now measure each angle explicitly with a protractor.
5) Measure and cut the trim, and install as described above – and I know you’re asking about how to cut those non-45-degree angles. Look down below at a comment/question from Joe Long on March 21, 2012 where he asked this as well. My answer is just below along with a link to a picture of a special jig you’ll need to make for your saw. (It’s easy to do.) Once you make this, you can cut any angle you like. Suggest you practice these cuts on scrap wood as many times as necessary to be sure they’re exactly right before you cut your final trim pieces.
Hope this helps, and best of luck on your project! If you like, please send a photo or two when you’re done using the “contact” page above, and I’d be happy to post them here for you.
Mark – Below are two pictures of the shadow boxes I put up in my house based upon your tutorial. They came out really nice and I got to buy myself a nice nail gun for the project (an added plus!)
Kevin – Absolutely BEAUTIFUL job. And I’m so glad you found the article helpful for your project! Everything truly looks terrific, and I have to tell you that your railing caught my wife’s eye… You may end up costing me more money now, as I think my railing may be deemed “in need of an upgrade” soon… ;-)
Mark how did you finish the white around and within the trim work? Is that just painted on the walls? What type of paint did you use?
It’s all painted Felix – 3 coats of semi gloss. The semi gloss is important as it tends to clean up pretty well, and this is a high-traffic area. However, it also tends to show imperfections on the walls underneath more than flat, satin or eggshell paint bases – so you have to be particularly METICULOUS with the construction. Be sure to use the wood filler and caulk as carefully as you can as described above; get everything as nice as possible before you paint.
I used Benjamin Moore Super White in the work you see here.
Mark,
Great job. Where did you buy that trim at? I’m having trouble looking at a similar design. Is it a base cap or panel moulding?
I used a 1-1/4″ x 3/8″ hardwood panel molding for the wall frames, Patrick. The only place I used a base cap in this design was adjacent to the hardwood floors. The trim itself was a stock item from a local hardware store; I spent a long time looking for just-the-right-material as well.
Mark,
I have read your article many times. I am a little overwhelmed with the molding selection. What size of chair rail molding did you use? Does your panel molding or chair rail have a name? I am paranoid of buying panel molding/chair rail that aren’t in proportion to each other. I am also replacing the baseboard with 5 1/4 molding.
Hi Shari – The molding selection can indeed be overwhelming; I can understand that completely. A couple of tips follow that may help, but first let me answer your question: my chair rail is 2.5″ and it’s nothing custom (with a specific name that I know of) – it’s just a stock item. But a couple of more general tips [things that I did] that may help you:
1) At your hardware store, buy a piece of most any molding that you like. Bring it home. Sometimes you don’t even have to pay for this stuff; there’s a scrap bin – and they may let you take 1-2′ scraps for free. But you have to get this stuff home to make the best decision what will work in your area. After you decide – return everything you didn’t like. (Don’t cut up any of the material, of course.) Then buy your final material in volume.
2) Start with a “practice area” if you can. The very first time I took on a project like this, I started with a basement stairway. I made my mistakes there, and I learned quite a lot there as well. Then, I moved to the more prominent areas of the house. Much better prepared.
And I’ll just add one more thing: a tall [5.25″] base molding, in my personal opinion will look awesome!! (I love tall base moldings.) Best of luck to you and hope this helps!
Your fine attention to detail Mark makes all the difference – nice post and the job done looks great as well!
Perhaps on your dining room redo, you could show us a picture of your jig you made for the mitre saw in order to cut the acute angle. My project stalled for a weekend or more while I figured out how to cut angles less than 45 degrees. It’s not fun, as you have to clamp down a pre-cut guide on to the saw and push the material in from the face, instead of from the side. Lots of trial and error.
Hi Joe –
I don’t have a picture of what I built, but I just found an illustration on another woodworking site. Click here to see almost exactly what I made – and then destroyed and tossed back into my scrap wood pile when I was done!
My dining room is getting underway, but at a snail’s pace with my work schedule; I think when it’s done I’ll eventually put up a multi-part article as it’s going to really be several projects put together. I’m hopeful it will come out nice – but at the rate I’m progressing, it’s definitely going to take a while. Hoping to check out some casing options this weekend, in fact…
Thanks, Monica! :-)
And Tom – Regarding your earlier question about getting to those “trick” angles with the miter saw on the stairway trim work – I built a temporary little “guide” out of neat/clean/precise scraps of wood that I had to allow me to present my molding to the miter saw *perpendicular* to the normal orientation.
In this way, I was able to cut based on the complement of the angle I needed (90-degrees minus my angle) and achieve my desired result. You may need to “tune” this procedure a little bit based on your specific circumstances – but that’s the essence of what I did. Here also, this is a perfect example as to why I tested all such cuts on scraps first and then mapped to my markings on the walls to verify. Tricky!!
I’m about to get a refresher in all of this yet again; I started tearing apart my dining room this weekend for another trim work project. I plan to be add crown moldings, fluted casings, rosettes, chair rails, wall frames/shadow boxes and possibly even adding a faux finish within the shadow boxes if it all seems to work well together. It’s somewhat ambitious, but there’s no rush – and I’ll break it down into stages. I spent a good part of this past Saturday patching holes in the sheet rock, marking out studs (and pipes) and painting the ceiling. That would be “Step 1.”
Best of luck on your stairway trim work project, Tom!
Very elegant Mark. Great work!
Wow, Mark! The results are amazing. I can see your advice on being exact and taking your time pays off. You end up with a result you can really be proud of. You should have signed your work under the paint. Please read on.
I remember removing years of paint from a room that was destined to be the nursery for our first-born. While the oldest part of the house (the kitchen) was reputedly from the 1790s, this little room at the top of the stairs probably came into being when the house was moved (downhill!) around 1875. When I reached the bare wood, I round the curly script of someone who I took to be the craftsman that built the trim around the windows. I felt so honored to be restoring his work to near-original condition. And it came out well. You could now see all the detail in the trim, as opposed to the smoothing over of what was once crisp details by many layers of paint.
I looked to that room and the trim in the original part of the house for inspiration when I went to redo the trim in the new addition containing the family room, that the previous owners had added. This being my first house, trim work wasn’t even in my lexicon. So even the simplest concept was a learning experience to me, like the fact that fancy trim is built up from multiple pieces of wood. The other learning point was that the older the trim, the larger the scale seemed to be. So for floor moulding, instead of the current 2 3/4″ clamshell moulding that is everywhere, with maybe a little quarter-round tacked on at floor level, I could have easily used 1 x 6s for the base moulding.
The first thing I did with that pine trim was to take two passes with my router to simulate the older trim. The first pass put a “V” in the wood, about 3/8″ from the inside edge. The second pass rounded off the sharp inside edge, having the radius end at the near end of the top of the “V”. I then added whatever stock moulding I could find to the outside edge to build it out. The depth isn’t as great as the older stuff, but you mostly get the same effect.
I remember my friend in the trade saying that sometimes you don’t notice these details (unless it’s as dramatic as your project!) consciously when you walk into a room, but you DO pick up on it on some level, and the room just seems right.
Thanks for sharing this ambitious and crazy-well executed project.
Thanks, Phil! I’ve never had the opportunity to own a home from the 18th century, and it’s clear you really enjoyed the time you spent at yours. It seems there’s always so much to learn from older homes, and unfortunately much of the craftsmanship of these eras is just not as common today. It’s funny, in a sad sense, that decorative trim work and even hardwood flooring are now considered upgrades when they really used to be much more the norm. An example of how “progress” may have really set us back a little, right?
Hi Mark, looks great. I am doing the same thing now up my stairs, but I can’t figure out how to cut the molding on the picture box because it’s steep and my miter saw doesn’t go that angle. How do you do that?
Tom
Gorgeous work! Thanks for the inspiration.