2023 Update – Originally Published August, 2012
I previously wrote about maintenance tips for redwood swing sets – and in that article I mentioned I would soon be rebuilding a good part of my set with fresh manufacturer’s redwood along with some new replacement swings and accessories. I wanted to take my 11-year-old set and make it look brand new. Some of you responded with detailed comments within the thread of that first article while others emailed me directly, and I could see that this is a topic of some interest. That being said, I wanted to get additional information posted that might further help with what I believe is probably the key question many of you may be grappling with…
Should I buy a new redwood swing set or should I buy used set and restore it myself?
There’s no question – these sets are crazy expensive.
And there’s also no question, redwood swing sets need to be maintained.
Just to recap briefly, in my original summary, 7 Tips for Maintaining a Redwood Swing Set, I described my personal experiences and suggestions for doing all you can to keep the sets looking great for as long as possible:
1) Cleaning the Canopy
2) Staining the Redwood
3) Cleaning the Yellow (Rubberized) Stairs and Swing Chains
4) Dealing with Wood Rotting and Splitting
5) Trying to Deal with Insect Damage
6) Utilizing your Warranty
7) Buying Replacement Parts
In this follow-on article (now in its second revision), I’m now going to focus on my personal experiences with the down & dirty details of what happens after you invoke Steps 6 and 7, hoping to answer the question:
What does it take to truly restore one of these redwood swing sets?
A Used Redwood Set – What You May Be Starting Out With
My set, from about 25 feet away looked terrific, even at eleven years old. This would fetch a pretty good “used set” price for sure…
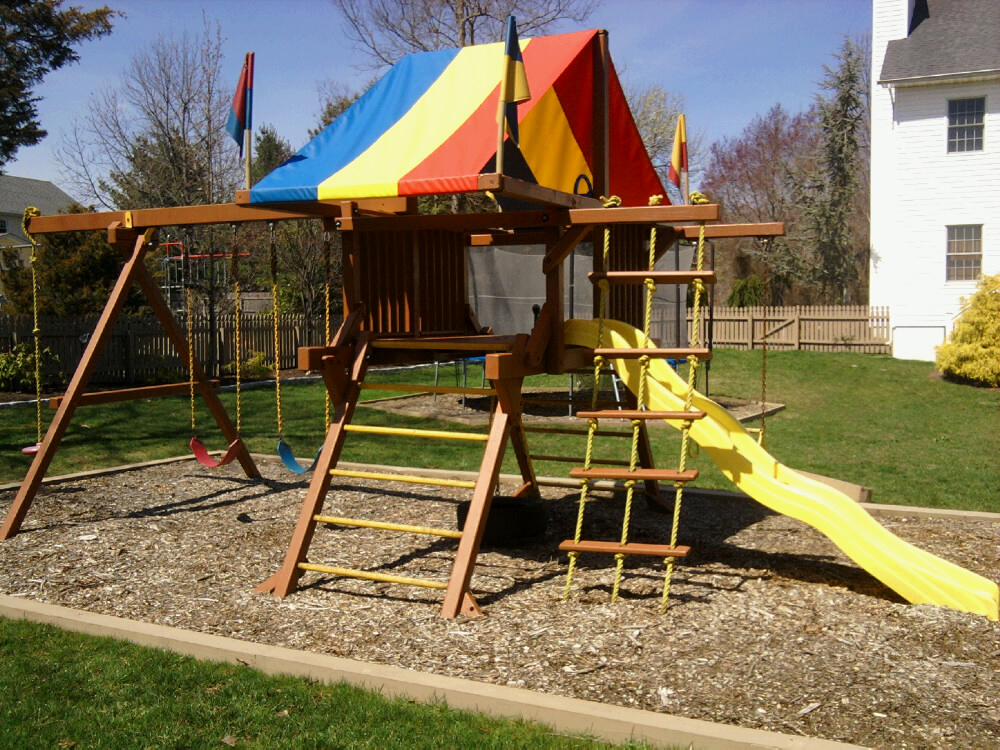
In fact, with all the maintenance I had been doing over the years – some people were surprised that I was doing anything with it at all – but there are certain realities that come with time that require much closer inspection.
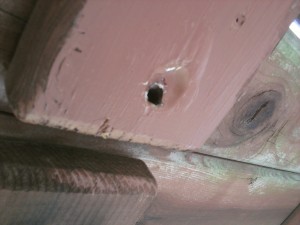
Insect damage (carpenter bees in my case) can result in permanent weakening of the infrastructure:
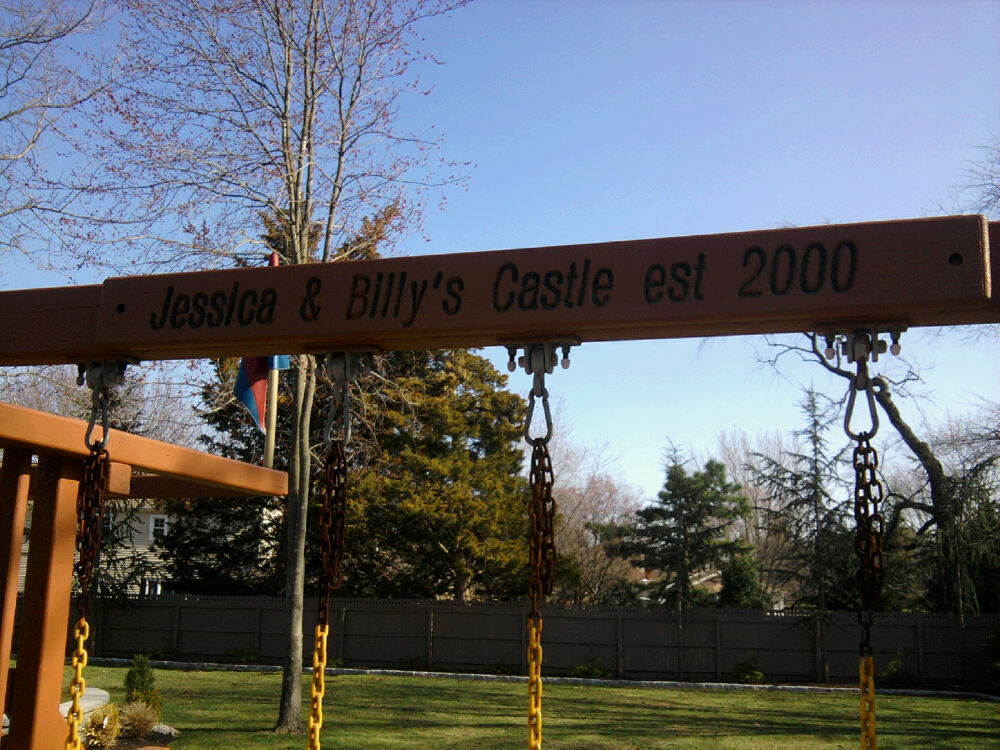
Rusting of the swing chains is also another factor – it doesn’t seem to happen to all sets, but this can look pretty terrible once you take a closer look. Nobody wants their children touching this stuff, even if it’s up high on the swings. (As a kid – I know I was often standing up on swings, reaching high up on the chains!) Click on the picture just below to get a better look…
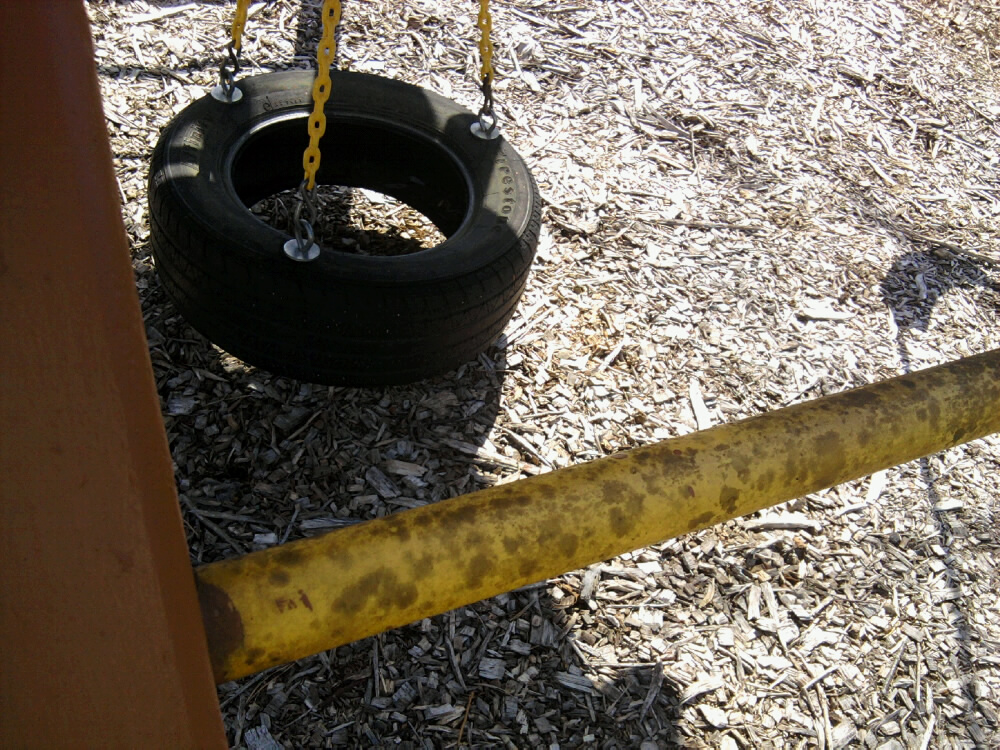
The yellow, rubberized coating can surely also decay with age depending on climate conditions; here’s a shot of what mine looked like. Once again, clicking the picture will give you a much closer look:
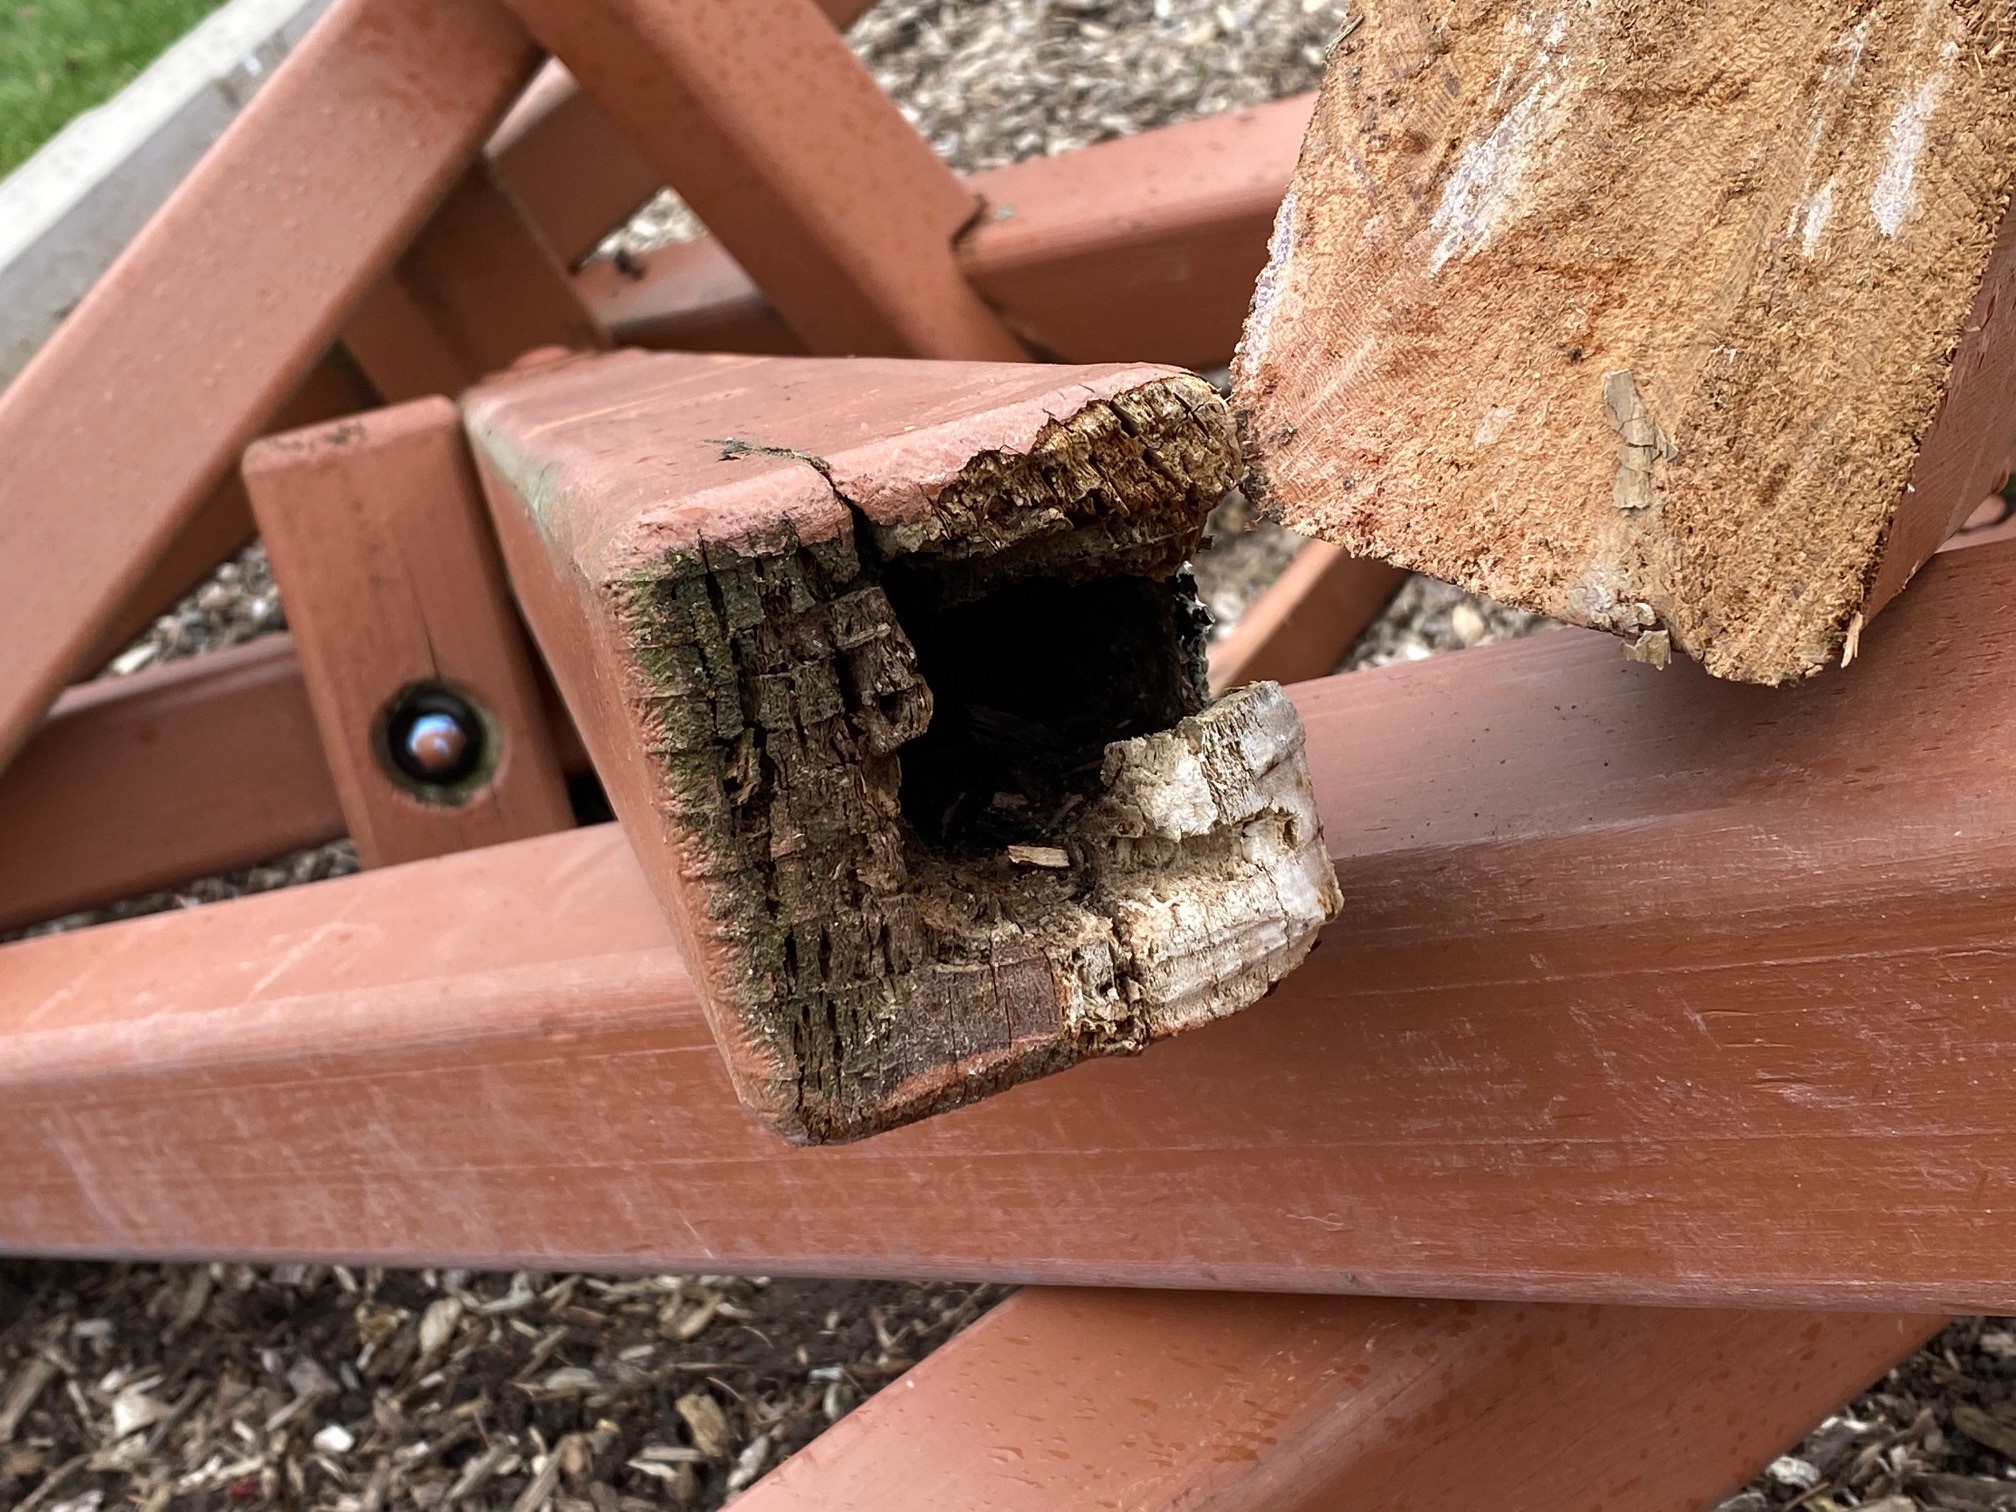
And then, there’s the wood rotting. Here’s where you need to be particularly careful – because there’s the rotting you can see, but worse, there’s also the rotting you cannot see. Here’s a photo of one of my swing set legs that also appeared in the earlier article. You can surely sort-of see initial signs of splitting and rot, right? This is what you might come across if you were checking out a used set. And you’d be wise to it.
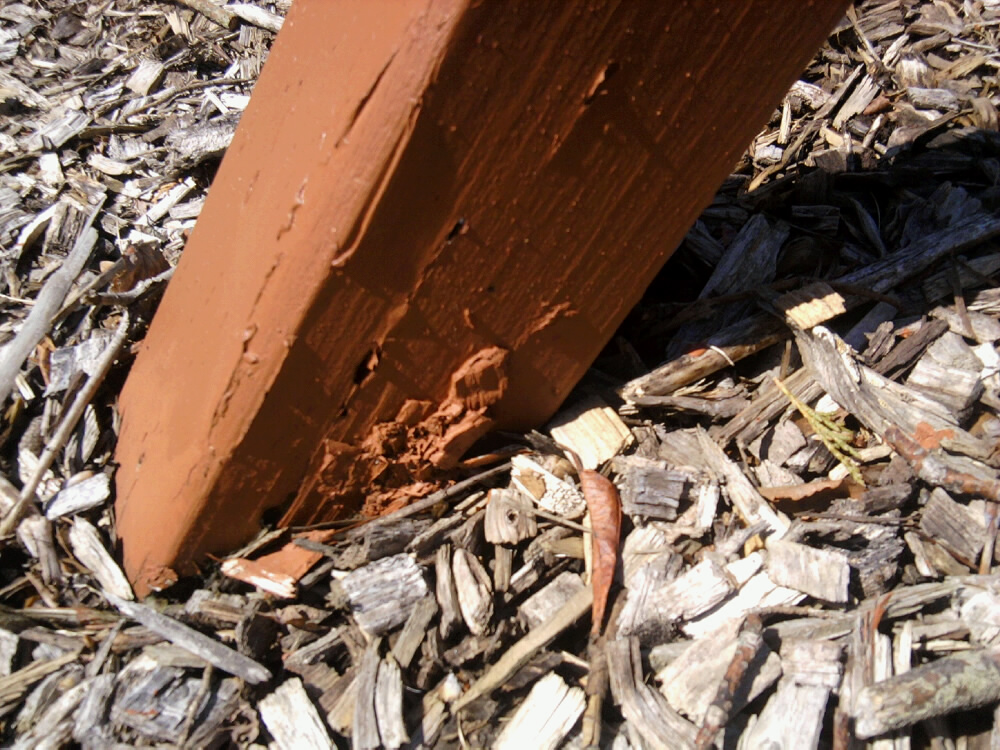
But in the next shot – you’ll see the same leg after removing it from the ground:
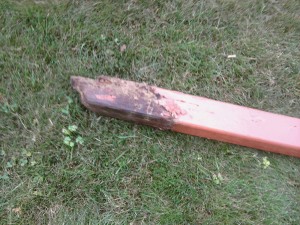
Clearly – the damage is far more extensive than it appeared at the surface!
I’m now going to show you just how far this can go – as I journal my effort to rehab my own entire set.
Replacement Playground Equipment Parts & Support
Most swing set manufacturers are unlikely to extend the project warranty to anyone other than the original purchaser, so if you’re buying a used set it’s prudent to anticipate that you’ll need to purchase replacement redwood pieces. Furthermore, items like swings with rusted chains and torn or faded canopies are much less likely to be covered under any warranty – unless they’re less than a year old or so. And if you’re striving for authenticity – these clearly need to be purchased from the original manufacturer as well.
If you are the original owner – then surely contact your manufacturer and inquire about the details of your warranty. For me, it was a lifetime warranty on all wood pieces that could be shown to have any signs of rot or insect damage. I needed to complete a “Warranty Request Form,” provide a copy of the original purchase receipt – and photograph all pieces of wood that I wanted replaced, clearly pointing out the damage areas. It was a lot like filing an insurance claim.
After about a week – they got back to me with an itemized quote.
The wood pieces I needed would all be provided at no cost – though I needed to pay the shipping. Furthermore, they also provided the option to have a technician come out and install everything – which I would have to pay for. I opted to do this, because I was replacing so much of the set that I wanted someone here who had done it many, many times before. The person they lined up was local, he had been working on their sets for several years – and he was frankly outstanding. As with all such projects – there’s were surely surprises, but we got through them.
Of course, you can always find a local contractor on your own as well – but I’d strongly recommend you get more than a laborer for a project like this: you need a craftsman and preferably one that has specific experience with your set – and extra parts you may not have anticipated needing.
Breaking Down the Swing Set – Hidden Surprises
Here’s where those of you who are considering buying a used set might be a little taken back.
You saw my set. I thought it looked pretty good – but after carefully photographing the damaged wood pieces for the warranty request, I ended up with a pretty significant list of required replacement parts. The new wood is shown below on the week prior to the renovation:
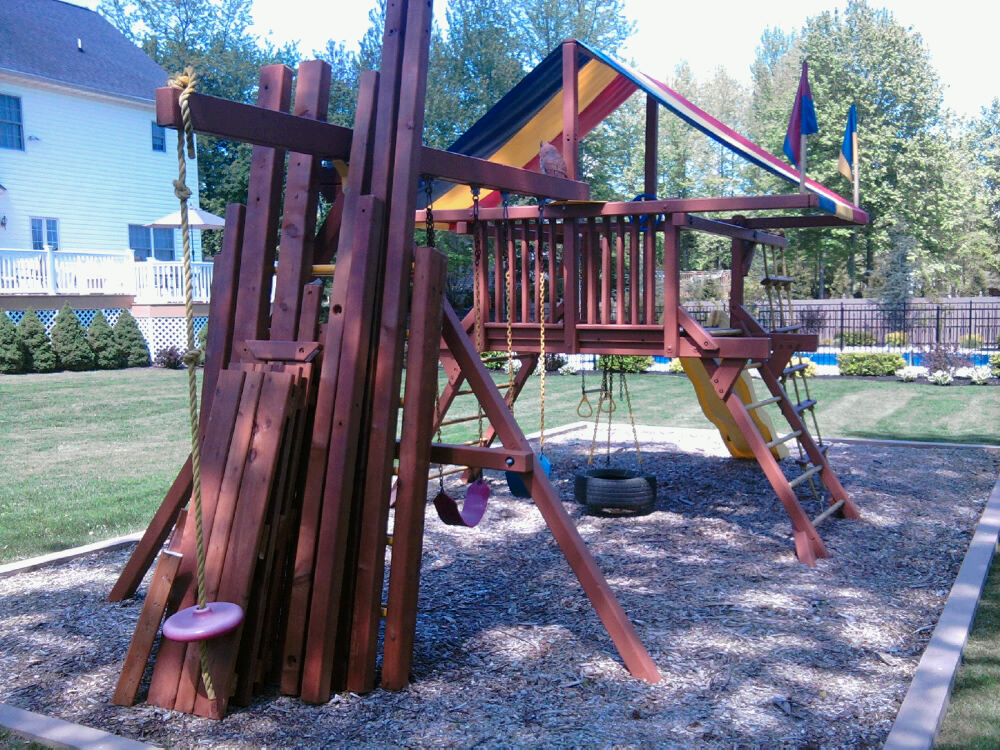
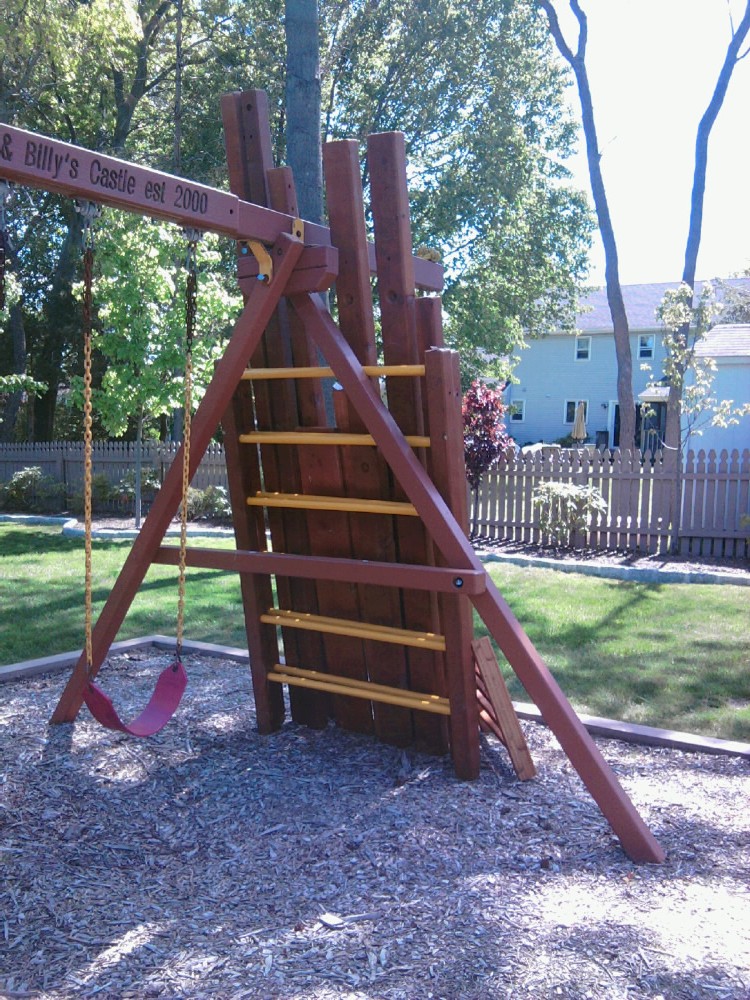
I know I said this before, but it bears repeating: my swing set manufacturer was really impressive with this. They simply replaced all of this wood at zero cost; I paid only shipping expenses. This is really a lot of wood, as you can now see quite tangibly – and the ladder pieces (with the yellow rubberized steps) are, of course, more than just wood. All covered by the warranty.
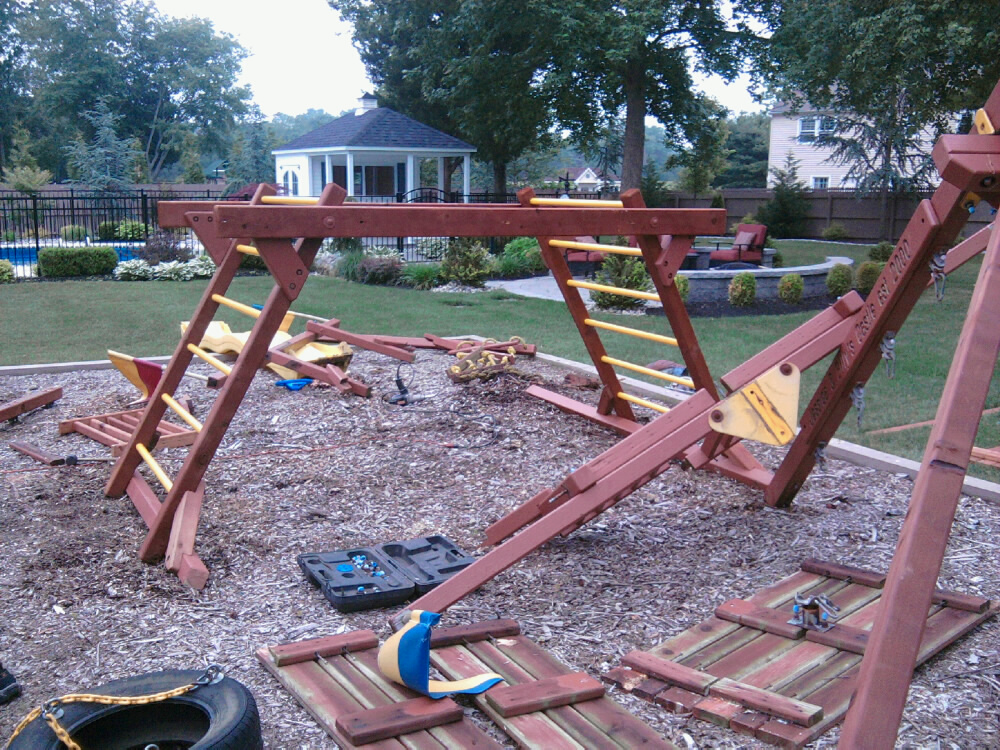
On the day of the construction, I met with the contractor – and we went through everything. He started breaking things down, and in a matter of 20-25 minutes, my carefully maintained redwood swing set looked like this…
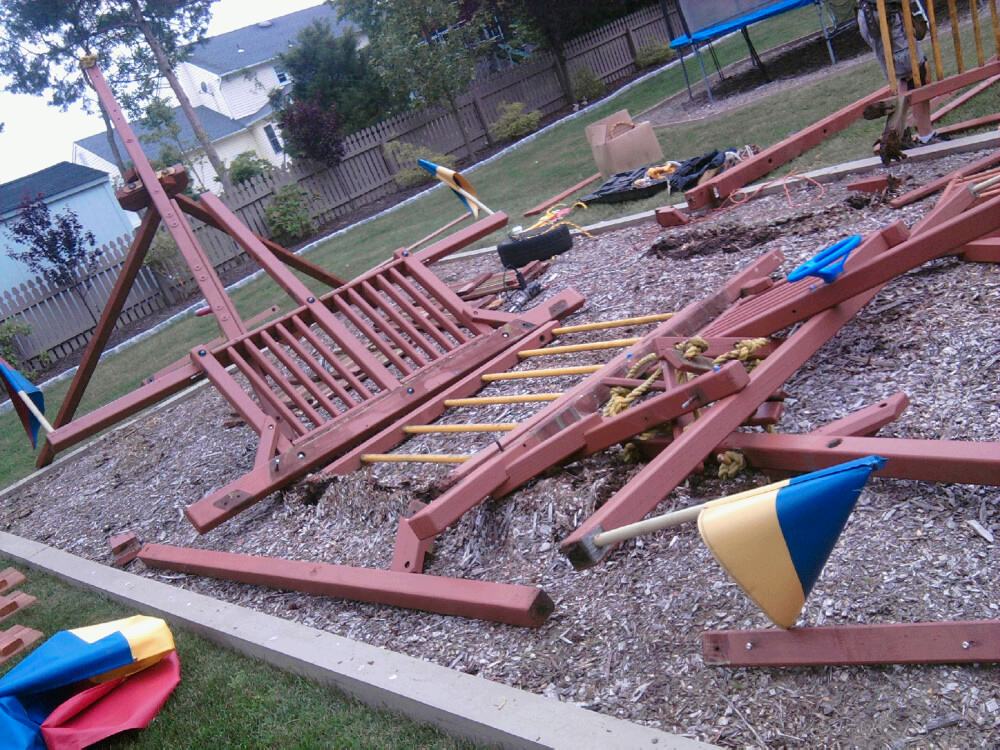
And here’s where the surprises begin.
Surprise Number 1: I had inadvertently destroyed the footer lumber
Over the years, it’s a matter of good maintenance to refresh the mulch every couple of years. Take a look at the bottom step on the ladder in the picture below and notice just below the yellow step, there’s about 3-4 inches down to the mulch. That is not the way this is supposed to be!

At some point, mulch had completely covered the foundation 4×4 pieces that supported the entire set. Once we broke down the set – these pieces were “unearthed” and can you imagine what they looked like? Okay… you don’t actually have to imagine. They looked like this:
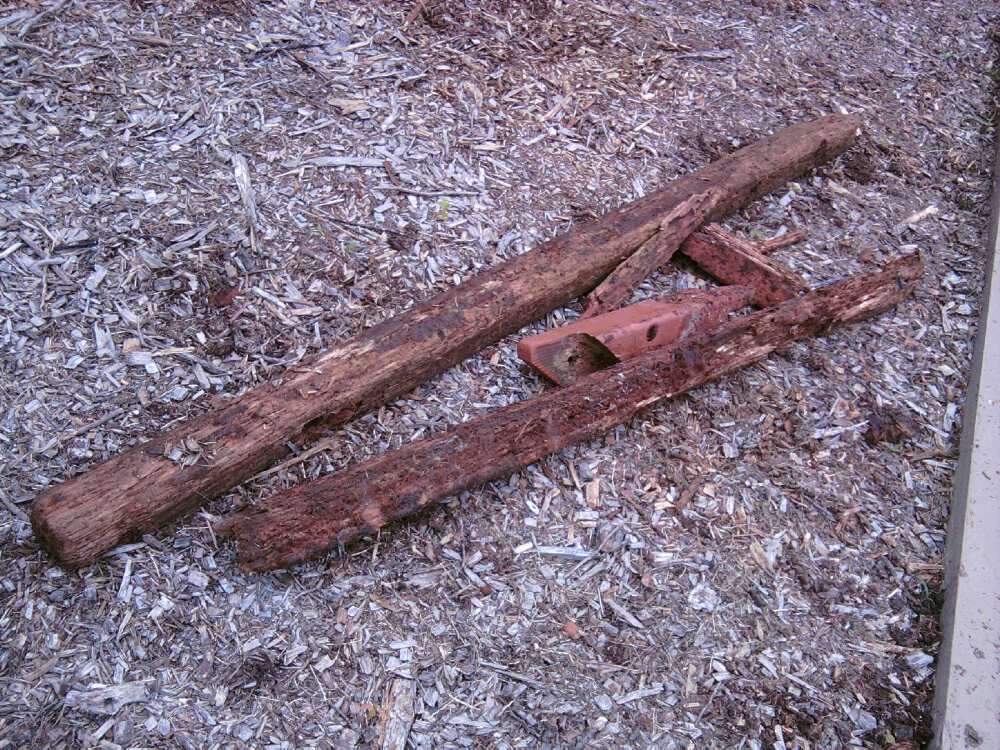
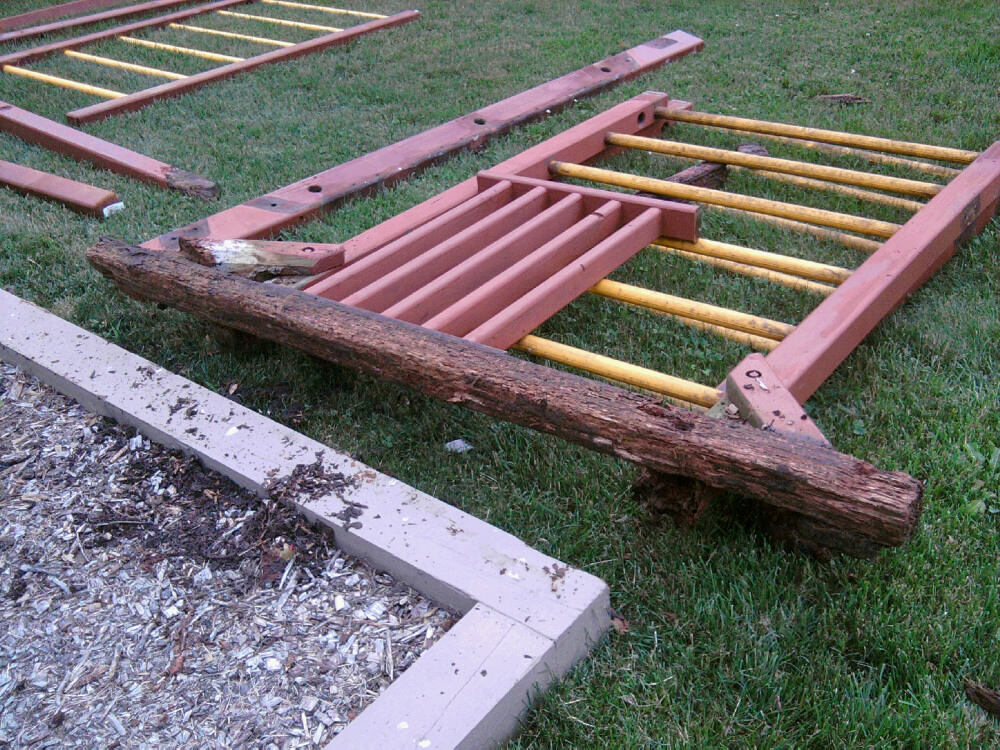
In essence, completely destroyed – there was surely no way these could be reused to support the swing set. We had to manufacture new pieces on the fly. At first, my contractor though he would have to come back after I ordered additional pieces via the manufacturer’s warranty. But I pointed out that we were replacing so much wood, we could manufacture new footers from the old wood. We ended up using the two legs you can see on the left side of the set in the still-assembled picture just above (as these were being replaced anyway) – and created new custom footers.
WARNING 1: If you’re buying a used set, be sure you can see and carefully inspect these footers. At the end of this article, you’ll see clearly what they should look like.
WARNING 2: If you’re rehabbing an existing set via a manufacturer’s warranty as I was, be sure you request replacement footers along with anything else you need – these are very easy to overlook and you could end up tearing the set down to find you cannot subsequently rebuild it.
Surprise Number 2: Beyond the footers, there was far more rot than anticipated
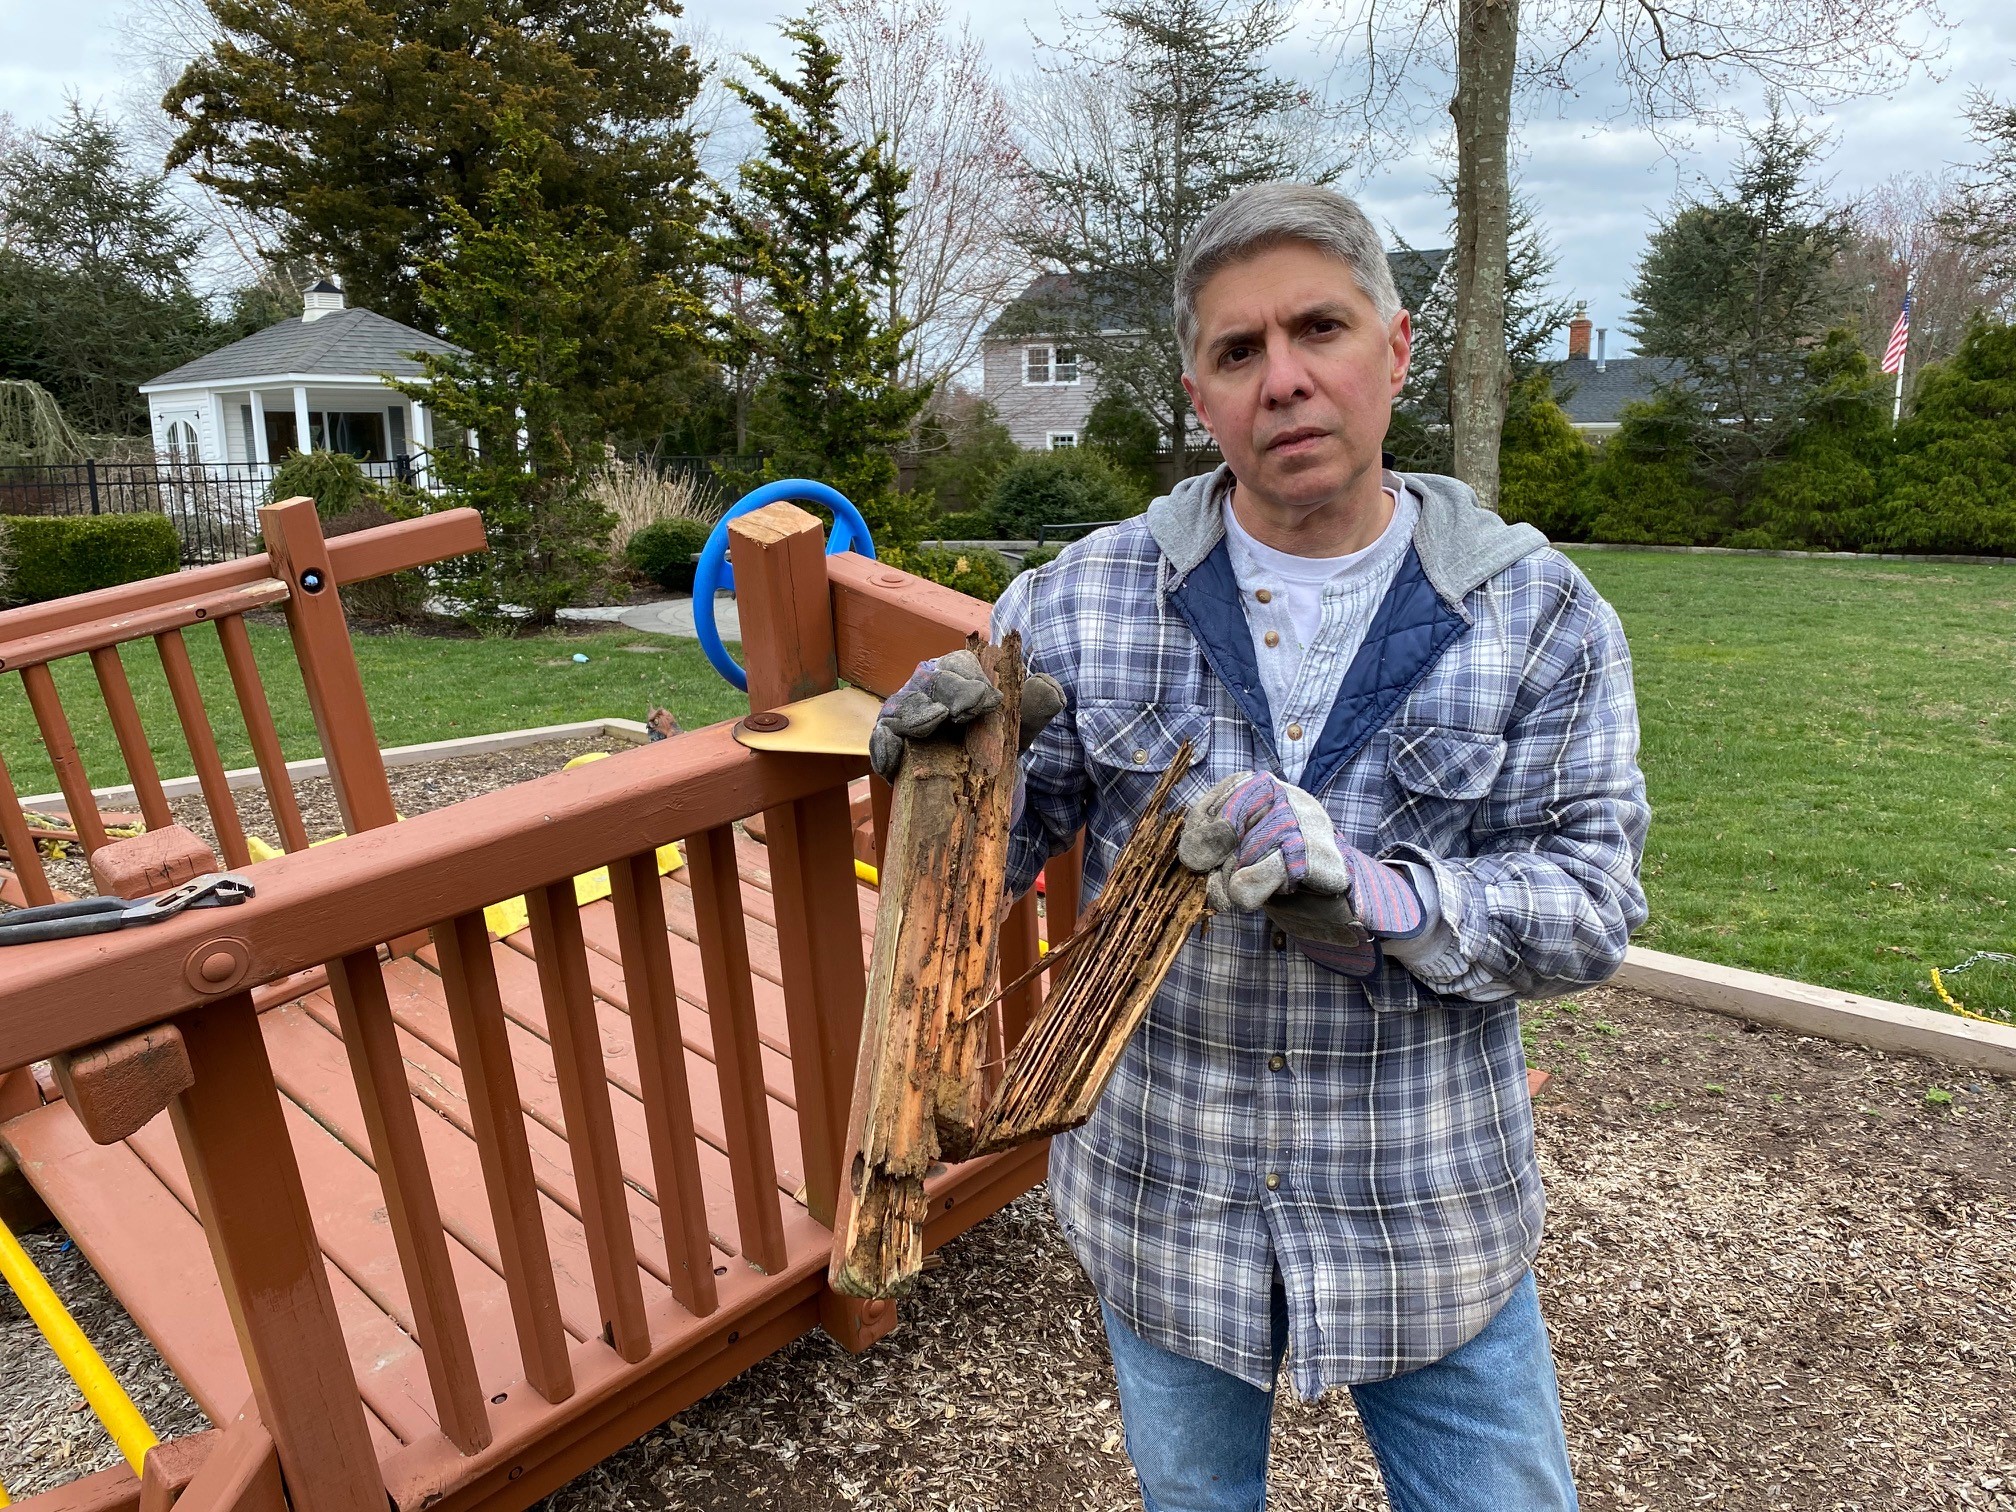
I already showed you the extent of the true rot on that one leg earlier. Let me now show you what the decking looked like. While assembled, it looked just fine – of course. The deck in my set was comprised of 4 sub-assemblies, three of which had carpenter bee damage and would be replaced. But once the set was broken down, the carpenter bee damage seemed like “small potatoes.” The edges of my set’s decking are covered by what you might call a “molding” and had been quietly (and invisibly) rotting behind the aesthetic covering. Once exposed, the damage became quote obvious – and the wood crumpled to the touch…
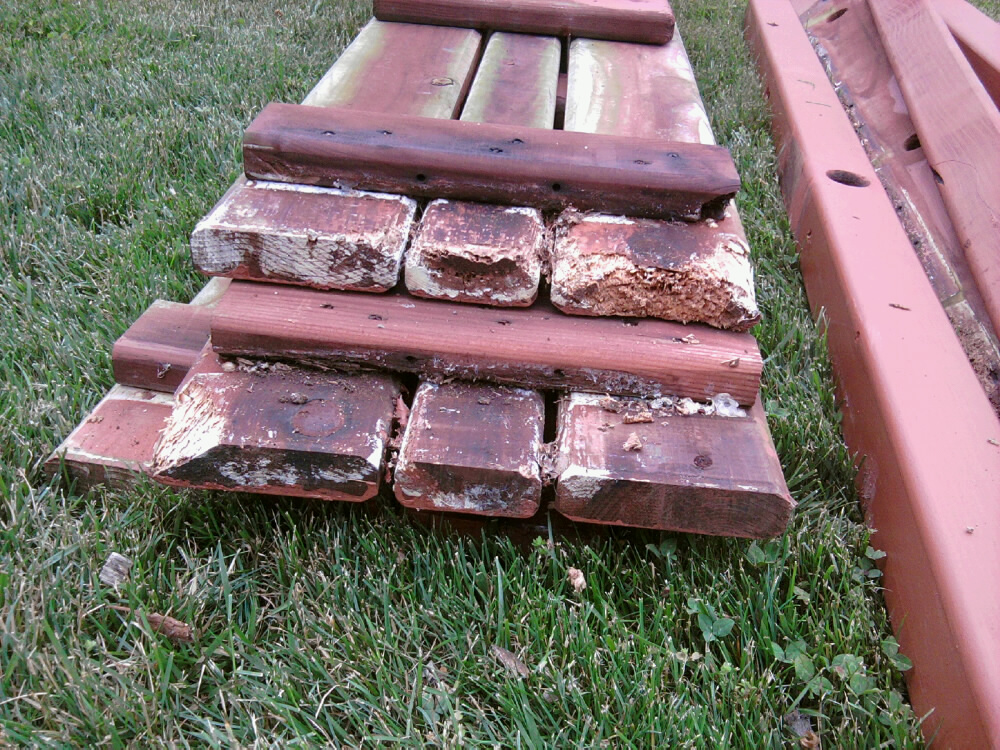
Fortunately, we were replacing three of these sections – so we were able to make due with the one older assembly, taking the best of the original four. One interesting thing, though – the new decking sections were thicker. So, once assembled – the older section had to be elevated a bit to keep things even. We used some shims I had in my basement. Once again, though, we had to improvise on the fly.
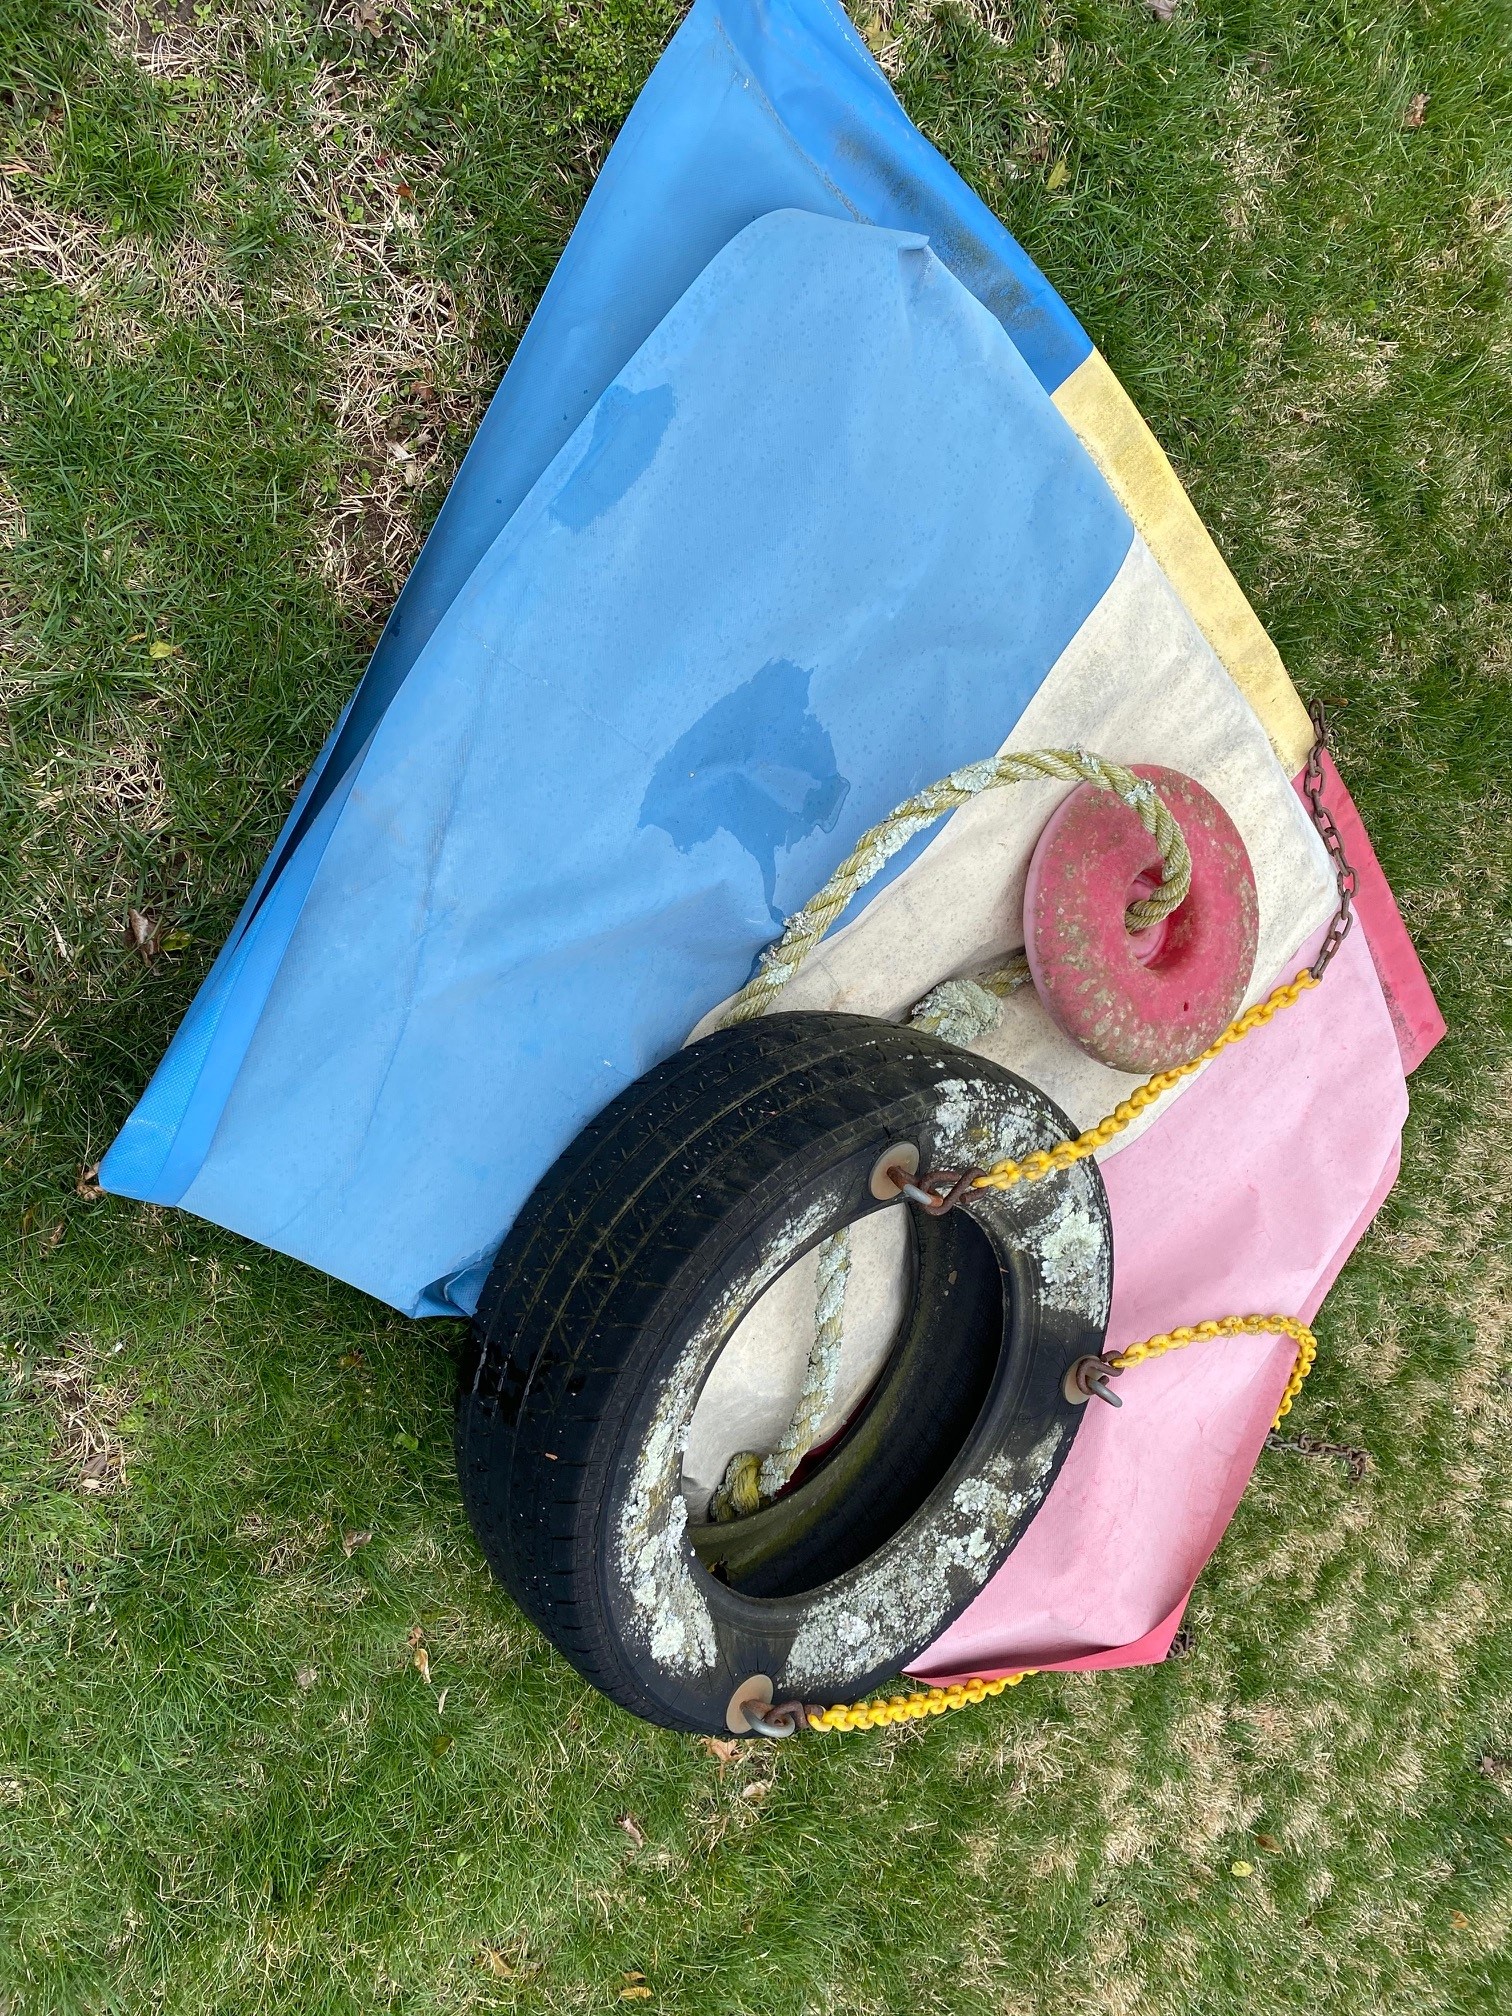
And below are just a few final shots of additional wood rot – and weathering/fading of the accessories too. It’s all perfectly natural and to be expected. But the extent to which it progresses is somehow always surprising. At least to me, anyway…
Surprise Number 3: The hardware may not be completely reusable
I alluded to this earlier as one of the reasons to use a contractor with specific experience with your set. You need a guy who arrives with spare parts! Some of the bolts and nuts were simply corroded and didn’t really want to re-thread. I had experienced some problems with this a couple of years ago while making some smaller tunes to the set and ended up at the hardware store trying to improvise. But, it was no issue with the contractor who did my job – he was experienced enough to anticipate this, and he was prepared for it.
The Swing Set Restoration: Putting it All Back Together
The first order of business was manufacturing those new footers.
The new legs were added to the end of the set first – and the older, partially-rotten legs were turned into footers for the fort assembly. The first shot below is of the new legs, and the following two shots show the fort assembly and new custom-made footers. Note how beautifully clean the yellow rubber is on those stairs. Nice, right?
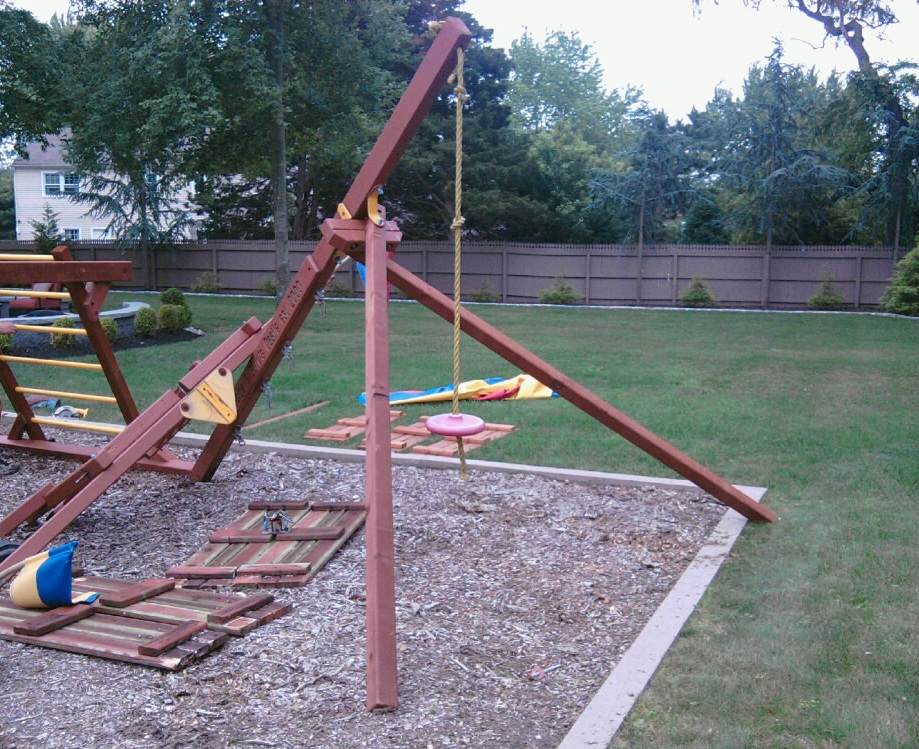
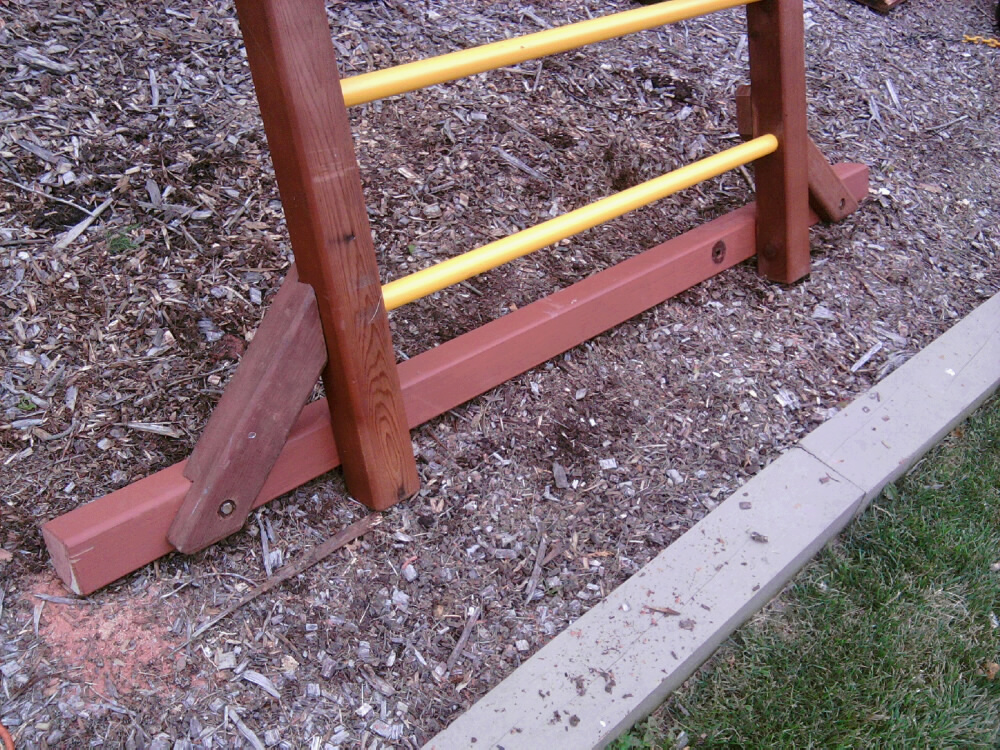
Once the above assembly was secure, the new swing set foundation was essentially established.
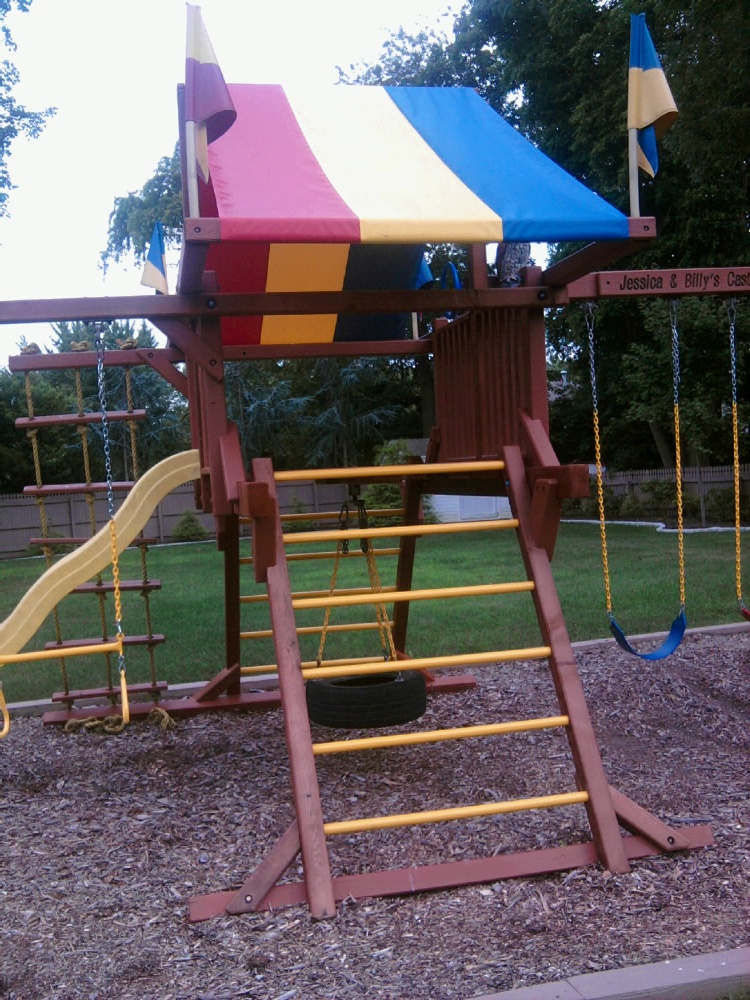
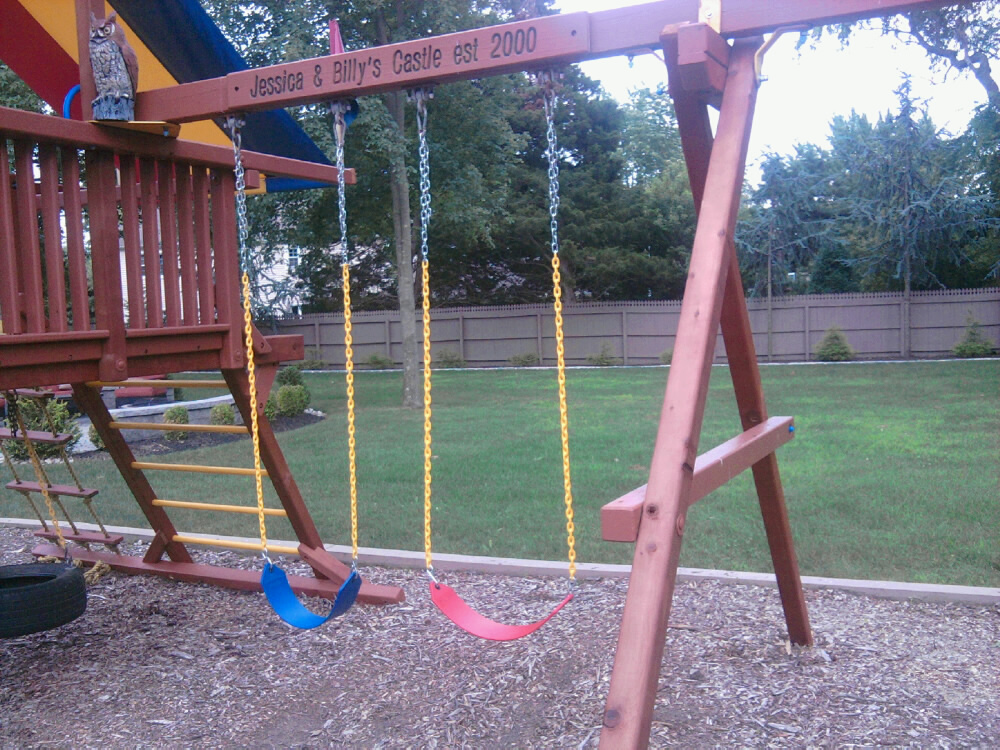
The rest of the set was then assembled with some of the old pieces and a lot of new redwood pieces. Plus – I had purchased new swings and a trapeze (without rusted chains) and the canopy was essentially brand new as well as I had installed that only a few months earlier myself.
Some final aesthetic tunes were needed: I had to do some wood filler patching and redwood stain touch-ups on the customer footers where there were existing holes from their previous use as legs. And once these final items are fully completed – I end up with what you might consider a stunningly new-looking set. Complete with that new redwood swing set smell… :-)
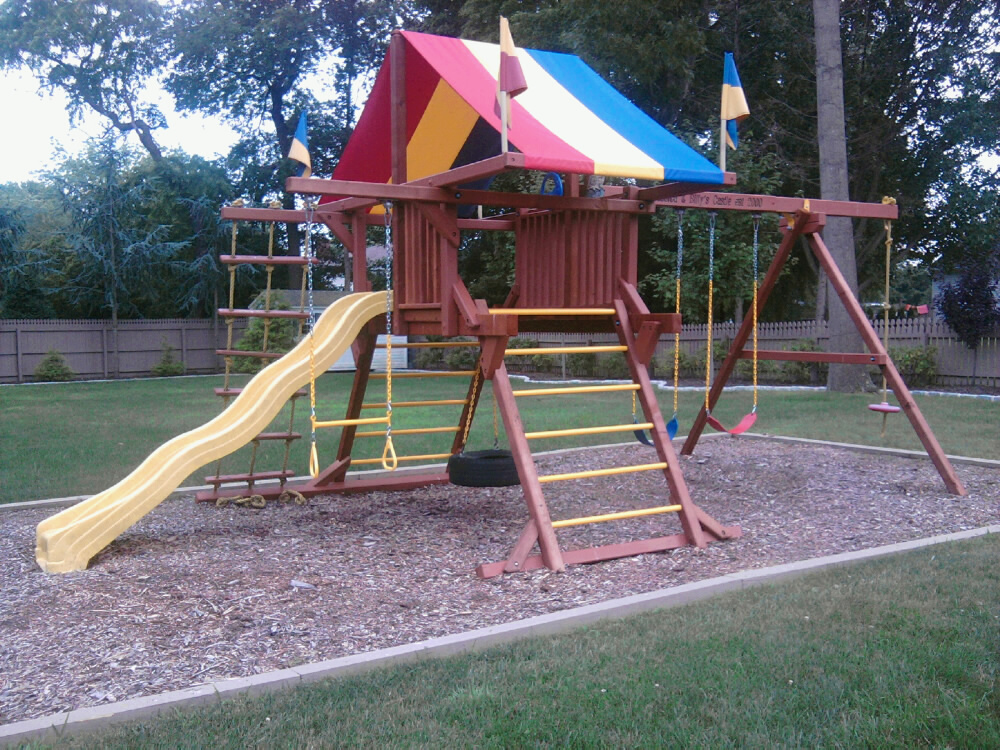
So – Should I Buy Used or Should I Buy New?
I think this is a personal question that depends on your specific circumstances: Do you want a lower-priced set to use for just a few years? Does having a brand new set with customized perks that you specifically choose feel better to you? Are you intending on maintaining your set for 30 years like me?
But one thing for sure, in order to make such a decision wisely – you have to know what you might be getting into. I can tell you that I was struggling with this same question several years ago, and I wasn’t aware of most of the nuances I’ve described in this article or the earlier companion piece, 7 Tips for Maintaining a Redwood Swing Set. In fact, this has surely a large part of my motivation for writing these.
And so, in closing, I can definitely recommend the following:
1) Shop around – and ask difficult questions. I truly believe (now more than ever) that if you chose to buy new, dealing with a reputable company with a good warranty is imperative. There are several companies that sell these sets. And beyond redwood, there are of course cedar swing sets and pine sets as well. Do your homework and get everything related to warranty details in crisp, clear writing.
2) If you’re going to buy a used set – anticipate surprises, and you surely have a very good idea what many of those could now be. Will there be others? I’m sure. And to that point, I would ask that when you stumble across anything that hasn’t been addressed here – please leave additional stories and wisdom below so everyone can benefit. Does anything come right to mind?

Hi Mark, I’m so happy to have found your site. I recently purchased my neighbor’s Rainbow Playset, circa 2012. I had the local Rainbow folks move it to my yard, 2 doors away.
When I went to stain it, I find that the wood has a lot of moisture.. there is some rot near the bottom. We are in Minnesota, so there is some slight green mossy growth on the north sides. There is white fungus-y growth in the ceiling of the bottom room of the tower, and even two mushrooms growing in that room. That sounds terrible, but otherwise it seems sturdy.
1. What should I treat the fungus and moss with before sealing the wood? I have some Wet-and-Forget around from a roofing project, will it damage the wood?
2. I’m on good terms with my neighbors, could maybe have them request parts from the company under warranty. How do I decide what parts need to be replaced, how bad do they have to be? I think I know the right handyman to install them.
I’m a 70-year-old desk jockey, and I won’t be doing any heavy labor myself. Scrubbing and staining is my limit. I don’t want the Playset to be pristine like yours, but to be safe for about 15 years for my grandchildren. Thanks for all your work!!
Hey Kit –
Congrats on the purchase – and I’m sure you’ll have a LOT of fun with the set with your grandchildren; it’s such a focal area, especially for birthday parties, we found. On your two questions, I’m going to focus on one singular response. It’s this: I don’t know Minnesota nuances, but… if there’s any significant wood damage at all and you can leverage the warranty, just take photos and submit these with your claim to Rainbow. For me? They simply replaced everything. (I had to pay the shipping.) So, if that fungus damage is sufficiently intrusive – they might replace those pieces too. And if not, I strongly suspect the local Rainbow folks will have the best answer for your Minnesota mushroom issues. (Most certainly better than I could surmise from NJ, anyway!)
Best of luck to you – and I really hope you can leverage that warranty!!
We bought a used set for $600 7ish years ago. It was about 8-10 years old. Because we read about the warranty conditions, we had the seller contact the company about replacing part of the roof, the footers and the four support posts before we disassembled it. We swapped the rock wall it came with for a swing beam that we purchased new. We spent a lot of time staining all of the pieces and put 2 coats of polyurethane on pieces that would contact the ground. Assembly was difficult even with pictures as the original assembly was on a hill, and our location is flat. Things didn’t quite line up, but we got it together. I just went out to clean things on it yesterday after we removed the rotted out ramp (we’re going to reinstall the rock wall) and found quite a lot of rotten wood in the platform floor area. The piece of wood where the straight slide attaches is rotted as well as some of the floorboard ends and the ladder attachment point. We have remnants from the original supports that we plan on using for some places. For the floorboards, we may buy from the consent or get PT replacements.
Those floorboards, Emily… on the ends. They simply rot. In my experience as well – for many years now. I was talking with a crew who, in part, demos these sets and one of them told me that from his perspective it was nearly every single time – the floorboard rot. One thing to consider: I created some of my own pieces from standard pressure treated lumber. (Cheap and easy.) And then… redwood stained them. Nobody knows. Well, unless they’re reading here!
Our Rainbow set was produced in 1993 so it is almost 30 years old. We
are not the original owners.
Can I still purchase and order replacement wood parts? I believe it
still has a decade left in it. Who knows, maybe there will be
grandchildren, certainly friends and neighbors.
I saw where I could get hardware, but not the needed wood pieces.
Maybe I haven’t looked well enough.
I also thought that a few years ago there was a dealer in our
community. I don’t believe this is any longer the case.
Thanks for the input.
Hey Michael,
I’m sure you can purchase the wood – even with the rubberized steps if that’s what you need. But it’s likely going to be pretty expensive, as it will need to be shipped from the manufacturing facility – which, I think, for Rainbow is located in South Dakota. (Perhaps they manufacture from other places as well – I’m not positive.)
Suggest the following options:
1) Find a local Rainbow dealer, go there with photos and measurements of your set. At ~30 years old – I strongly suspect they may have to custom re-create your wood pieces. (They had to do this for me with a canopy that was only 11 years old.) Suggest you get a quote – and see if this is worthwhile for you.
2) Or… Find a local handyman. A carpentry-centric handyman. Engage him/her to re-create your swing set pieces for you. I’ve built custom replacement pieces myself – and frankly, I used pressure treated lumber (cheaper) that I stained redwood so everything matched perfectly. (I use solid deck stain on my set – so the match is, indeed perfect every time.)
If you go with option 2, there’s a ‘find a contractor’ page on the site that could help – in case you don’t already have a local person. Actually – I can make it a little easier… here’s a direct link to find a local carpenter. And here’s another to find a local handyman/handyperson as well.
Option 3 is to give it a go yourself, of course. It’s frankly fun… sometimes. Other times: completely disgusting. The rot, the bugs, etc… ;)
I hope this is of some help – and best of luck to you!!
Mark
Hi Mark, we recently got a used play set very similar to the one you have shown I here. Thanks for sharing your experiences, tips, and tricks. We’re currently having many of the same challenges without the option of using the warranty. We need to replace the footers and probably use pressure treated pine. Do you have any tips for designing those little angled cross beams that give support from the footers to the legs? I was hoping to find a guide or a plan since my own wood working skills are amateur at best. Thank you!
Ah… I see your concern here, Jon – especially if you’re not comfortable with wood working, but I’m -positive- you’ll be able to pull this off!
These braces have a number of cuts to them. Fortunately, pressure-treated pine is low-cost, and you can practice until you get 4 braces. Even if you mess up 7 times before you land all four. I expect the left braces and right braces will differ; they’ll be mirror images of each other, most likely.
But I’d suggest, keep it simple. Perhaps something like this… 1) Carefully remove one redwood brace, making sure to keep the play set stable, 2) trace the cuts you’ll need to make onto a piece of pine (in 2 dimensions to start), 3) make these cuts first – even if with a hand saw. You won’t need perfection, but get it as close as you can. And once you have this, then… 4) focus on the notches, in the 3rd dimension. Again, I’ll assume you have a hand saw, minimally – be sure it’s a sharp, new hand saw to make your life easy… trace and cut the notches, best you can. Slow and steady. Then, 5) Test for fit and tune. When you’re satisfied – sand, stain and install, drilling the required holes, of course.
Here again – the left and right braces will differ, almost certainly. So, start with one from your old set (whichever) and get those 2 finalized. Then switch to the mirror image brace. The main things to keep in mind as I see it: a) you’re under no time pressure – slow and steady, b) use the old redwood braces as your templates, even if they’re rotting, and c) plan to fail a bunch of times before you land all 4 braces to your satisfaction. You’ll feel great, I predict, when you get this all together.
Hope this of is some help – and best of luck!
Great article thank you. I have the exact same one I got from my back yard neighbor. The main beams that support the tower are rotted out. I am going to brace them with pressure treated lumber and lag bolts. Where did you get the footer beams you had replaced from the destroyed ones?
Those new footers were ‘salvage’ from portions of the original set I received warranty-replacement-wood for, Ryan. (If you look closely at the one shot of the ‘new footer’ above you’ll see it has a hole bored through it – it was an original leg, I think. I filled that hole with wood filler.)
But I’d simply use pressure treated 4×4’s. In fact, I’d personally prefer using pressure treated 4×4’s for the footers as compared to redwood; they’re so often sitting on wet mulch. And they don’t really need to be redwood. But… you paint (solid stain) them to match of course.
Great Post Mark, very helpful. My wife & I are rehabbing an 8 year-old set, and your post is highlighting a few things we have not considered and is giving us confidence on other areas because it confirmed a few things we have already done. We were struggling with the cleaning of very dirty plasti-dipped chains and Trapeze. I tried a Magic Eraser, Dawn, Simple Green, a pressure washer, and a ton of elbow grease all with very limited success. I was looking into re-dipping them (with Flex-Seal Liquid) when I found a bottle of Clorox Clean-up under my sink. With nothing to lose, I gave it a try. I put the chains in the bucket along with just enough liquid to cover them. I rocked the bucket back & forth a few times to circulate the solution and left it sit for 15 minutes. When I came back, 80% of the stains were gone and the ones that remained needed only minimal scrubbing with a firm plastic brush. I gave the chains a good rinse, let them dry in the sun and they looked like new. The next dirtiest item on the playset was the 1 inch thick poly rope which was used at several places throughout the set. We found the best way to clean it was with a good blast from the pressure washer. I would be reluctant to soak the rope in Clorox Clean-up out of fear of weakening the fibers. You can make a DIY version of Clorox Clean-up using Regular Bleach (5.25% Sodium Hypochlorite) at 1:2 ratio with water & a little liquid laundry detergent. So for 1 gallon of solution you would need 42 oz of regular bleach, 84oz of water and 2oz of detergent (I use Tide) One question: You mentioned some damaged wood being covered under warranty: Is it safe to assume warranties only apply to the original owner? Even though I have the original sales receipt.
Awesome tip about the Clorox Clean-up, Matt – I’ll definitely give that a try! Goes without saying that’s been one of the biggest long-term challenges, keeping those plasti-dipped areas looking good. And most especially – getting them clean if they haven’t been regularly [at least annually in my experience] maintained. With the warranty, I’d definitely double check on that if you’re holding the original sales receipt; the nuances of these things can vary by manufacturer and over time. If that warranty is still, potentially, active for you – it could be a tremendous help. Like you imply above, my expectation would be on the lower side too as you’re not going to be in their database as the original purchaser… but I’d suggest it’s still worth the inquiry. In the worst case, that call or email might point you to more insights you can use for getting original replacement parts when you need them. Things like the flags and tarp, I’ve found, are really best from the original manufacturer. I also found, they may not stock every item on older sets – they sometimes need to be made for you, custom. Good luck to you – and thank again for the Clorox Clean-up suggestion. Maybe I’ll try switching to that as my go-to for annual cleaning. I hadn’t heard of that product before, and I just added an Amazon link above.
Hey Mark – your article is great, I’m in the middle of rehabbing a 13 year old set myself – just out of curiosity do you remember how much the replacement decking costs. I too need to replace about 3 of the sub-assemblies and just wondered what I’d be looking at replacement cost for each of those.
Thanks!
I wish I knew, Scott – I’m sorry I don’t. I got those three sections replaced by the manufacturer who still honored my warranty. They made me pay the shipping, but I didn’t get a breakdown of costs for each of the wood sections they replaced. Apologies, I can be no help at all on this… but I’m glad you’re finding the article helpful, and if you have cool pictures in the end (or ‘during’ would be even better) – please send them via the contact page! It’s always great to add material here for all to see…
Hello! I just scored a great deal a 10k set for 500 bucks only 2 years old so no rot but I would like to share what I did to make it last, the footers and all pieces that touch ground were in good shape before reassembling I powerwashed everything, the footprint of the set I dug 4 inches down and placed concrete on top of these I placed rubber pavers and just like that your set will not sink nor rot because of ground contact, every screw and bolt was also dipped in roofing tar to seal out water…it will get in…then full spray with redwood behr stain!
You got a 2-year-old $10K set for $500? John… you need to celebrate, pretty massively, right there! That’s an incredible deal! If at all possible, could you please take a photo for the concrete/rubber paver configuration you used? I think that be super useful to people reading here. [Use the contact page to email us and we’ll get it right into the comment stream here.] Thanks so much for sharing your insights and congratulations on nailing such an awesome deal!
Forgive me if this was discussed at all above, but were the buried parts of your structure put in concrete? Or did you just stick the redwood right into the ground? Was the hardware stainless or galvanized?
Hi Jay – Nothing is in concrete or buried; the set sits on top of the mulch or ground. It’s really important not to bury it in the ground, especially with the application of mulch over the years [as that will accelerate the inevitable rot]. It’s all about doing what you can to minimize the rot, via ongoing maintenance, in my experience. (There’s another article in the “Related Posts” list above that I’ve been keeping up to date and a HUGE number of people have contributed to as well… all adding maintenance tips for these play sets and it’s well-worth a review. Right up above or, heck, you can click here too!) As for the hardware – the manufacturer provided plastic end caps originally – I don’t actually recall if the hardware was stainless or galvanized, but hardware that I’ve personally replaced was indeed galvanized. Thanks for your comment, and hope this helps!
Mark
I just purchased the exact playscape for my grandson!
Do you have an assembly Manuel by chance???
So sorry Nita – I loaned that to someone a few years back… and that was the end of that! I’m pretty sure it’s called a Sunshine Castle, though. Rainbow was the manufacturer. I wouldn’t be surprised if they simply send you one; they’ve been quite good about things like that with me.
Well, this morning I started the Y2018 painting, mulching and play set “damage assessment” from the winter. My flags are pretty destroyed. I just did a quick Amazon search, but I’m not seeing any obvious candidates for replacement. Does anyone have any recommendations on these, by chance?
I would love to know if anyone reading has had success with plastidip on your yellow stairs and monkey bars. Magic eraser didn’t do much for me and our monkey bars have pine sap dripping from them. I may have to cut the plastic right off of those. I may be forced to try the plastidip, but I’ll feel a lot better knowing someone has had luck with it.
Love to hear how to fix yellow plastic on ladder rails… cleaning ain’t going to cut it.
Anyone?
Hi Mark – do you recall how much it cost you in shipping to have your replacement wood sent to you? I’m about to start cataloging the parts I need replaced on my Rainbow, and am wondering if it’s worth the effort of going through the manufacturer. Thanks!
Hey Brad – It’s definitely been a while, but it was on the order of a couple of hundred dollars. Do note, though, just how much they sent me. One thing that I found was they they were truly happy to replace any of the parts that I identified with damage – so don’t be shy when you put together your inventory. Good luck!
Hi Mark,
Have you hear of a rubber/vinyl cap that protects the parts of the wooden structure that are in contact with the ground? I was researching them a year ago, and now can’t remember what they are called! They just look like you can just pop them on, and they cover the bottom several inches of the play-set pieces.
Thanks!
May
Hi May – I just did a quick search on Amazon, where I find most of my stuff (and the associated user recommendations), but I couldn’t see anything matching there. One thought: I would call the play set manufacturer directly. My manufacturer [Rainbow] has been really helpful with questions like this… and I think your question should come with a “Part 2” as well: “If these exist, are they recommended? (If they don’t manufacture these themselves, I bet they’ll have a reason why!) Would you mind if I asked you to please report back to us on the site if you learn anything helpful here? Thanks so much for reaching out, and best of luck to you!
Thanks for your reply, Mark. The manufacturer rep was not familiar with the product either. Oh well! It was worth a try :)
-May
Thank you Mark. I read both of your blogs. We have the exact set and I am getting ready to start a rehab. I picked it up from a fellow firefighter about 6 months ago and there were carpenter ants that did a number on the fort footers. I plan on replacing those with pressure treated and because the stain is not the nicest I will have to get out the orbital palm sander. The rest of the structure looks pretty decent and after pricing the sandbox set out I believe we saved somewhere in the area of $4,000.00. Of course it will cost some as I get into the rehab but I have time because our little girl has only been walking for about 2 months now. Have you considered rubber mulch? Also I am considering putting cement (pacers) at the contact points so that the wood no longer sits in the soil or mulch. Thank you again for taking the time to show and explain your experiences.
Hey Mike – Glad you found the posts helpful, and I definitely think using pressure-treated footers is a good move. As for the rubber mulch – I looked into it as well, ages ago. At the time, I really didn’t like the look of it, plus it was very expensive. It wasn’t for me. One thought that may help you keep concrete out of the play area; some have used a plastic coating as an alternative. I haven’t used this myself – but a coating might help you achieve the same goal with less work and expense. I’ll come back to this comment and update it with a link to look at, simply to consider. I know a reader sent me one a while ago. More to come on that. Watch for another add-on to this comment just below soon…
Here you go, Mike… And like I said above – I haven’t tried this myself, but have a look right here. Perhaps this might be an alternative to consider as well? (I’m not sure I’d use the yellow personally, but perhaps a clear?) Best of luck with the rehab – you’re going to have a blast, and your daughter is going to love the set!
Mark-
Great write up with great info. I’m going to try to tackle a swing set restoration.
How or where did you get the name plate. The plate that says “Jessica and Billy’s Castle…”
Wow – that’s an excellent question, Brandon… Years ago, that was an option with the purchase of the new set from the local vendor we used. But I have no idea if that’s still generally offered. And frankly, I love that sign; I think that adds so, so much to the entire play area even today. I found a general link on Amazon right here with many custom wood sign options. I suspect one of these may be able to help, and since they’re all “custom” – you can very likely do something particularly nice – or even just point them to the photo from the article above. (That sign is indeed redwood, by the way.) Best of luck!
I am planning to remove the play house part of our playset. I want to make it just a swing set. I plan to replicate the brace on the other side. I found the 90 degree angle brackets but can’t find the yellow support brackets anywhere. Any ideas?
Thanks Mark, The reason I asked the question is that when the warranty department left me a voicemail with instructions. They mentioned they would replace wood and parts that have been maintained according to the manual. Which is kind of vague. Mine is a Rainbow with the lifetime warranty. I am assuming that yours is a Rainbow as well??
Thanks
Scott
Hi Scott – Mine is the same manufacturer, yes. I don’t recall all of the details, but I can say for sure that it was not vague. I’d suggest asking your contact for the authoritative terms and conditions of your specific warranty — but I just found a link that may help. The first paragraph (talking about “all North American Wooden Components”) sounds like exactly the criteria that I had to meet:
http://www.rainbownew.com/files/RainbowWarrantyPages.pdf
But, again, I’d definitely suggest getting it from your contact in writing, even if they’re just agreeing that the above link is in effect for you as well. Hope this helps, and if you learn anything further that may help others – I’d surely appreciate a follow up here. They were genuinely helpful when I dealt with them in 2011. Best of luck!
Mark,
I have had my set for 12 years. I am putting in a claim for several pieces to be replaced. However I have not sealed or stained in about 4 years. Do you know if this will effect me claim??
Thank you
Scott
Hi Scott – For my claim, this did not play in at all. It may depend on your manufacturer, of course – but in my case, this wasn’t questioned.
Has anyone tried disassembling the ladders? I just procured a used set exactly like the one pictured. The ladder legs are rotted but the rungs are in good shape after the cleaning I gave them. Since I’m not the original owner, I assume I can’t get warranty pieces. Even if I could, I can’t imagine the shipping would be less expensive than just buying the lumber. I’m wondering if the rungs are just pressed in and glued, or if there is some sort of internal bolt, at least on one side. I don’t want to start pounding on it if the only way to get the rungs out is to destroy the legs.
Hi Mark,
Thanks for your great article and photos about rehabbing a redwood swing set. We recently purchased a used set (approx. 5 yrs old) that had been neglected for at least the last couple years. I had read your article and the comments others had posted, particularly about how to get the dark grime and mildew off the yellow components. I used an OxiClean solution, Magic Erasers and several different brushes I had around the house to get the swing chains, chain ladder, rock wall hand holds, and canopy tarp looking like new again. I found the most useful tool was the wire brush end from a baby bottle cleaner that was just small enough to get between the links of the chains to remove the mildew and gunk. It took several hours of tedious work, but the results made the work worth it. I also used a dry wire brush on the rockwall handholds to get the mildew and age spots brushed clean and they look bright and new again as well. We do have some minor rot issues as would be expected, but overall the set is in great condition and was quite a deal since we only paid 10% of the retail cost of this set new.
My only question is if there are any ideas for repairing or patching the canopy tarp? There is about a 6 inch tear at the top of one side and although it is a minor issue now, I think it may get worse in time if we do not reinforce or repair it now. Any ideas?
Thanks again! Here are several before/after pictures and the final setup (we’ll stain in the spring).
Hi Bonnie – Thanks so much for your kind words and for the great tips, wisdom and before/after photos you submitted. To your question, I’m afraid I don’t have great news on the “tearing tarp” front. My tarp, a few years back, started tearing exactly as you described. I contacted the manufacturer and discovered that since my set was (at that time) 9 years old, it would have to be custom-manufactured for about $300. So, I tried some colored duct tape which held the tarp together for more than a year, but in the end – I replaced the tarp in total.
I’m sure you can find cheaper tarps, and perhaps your set isn’t old enough to warrant the custom job – even if you go with the original manufacturer as I did. But the colored duct tape was the only “patch” I could find for this problem, and it’s definitely temporary.
Your set really looks great – and it’s clear the number of hours you surely have spent cleaning and restoring. I suspect you may not be satisfied long-term with duct tape, as I wasn’t.
Great Article about rehabbing the playset. That’s helping me a ton to fix the used one I just picked up. But I do have one more question. The yellow bar ladder assembly main beams on mine are a little rotten on the bottom 2″ or so. The rest of the beam is still solid. On my set they are 6×6 beams. Is it possible to replace those. How are those ladder bars attached? Thanks for the help.
Hi Charles – Thanks for your message… Interesting question – here’s my personal take: I’ve never disassembled the stair assembly – and while there’s no question the bars fit very snugly within the each of the redwood beams, I strongly suspect there’s additional reinforcement with some type of adhesive as well. If it were me, I’d start by calling the manufacturer and checking on the cost of the entire bar ladder assembly. Believe it or not, I was told last year by a Rainbow technician that their warehouse had somewhat of an excess of some of these. I’m not saying the part will be cheap… but surely worth checking. Otherwise, I’d just build one – striving for the snug fit, of course, and I’d definitely reinforce with a construction adhesive.
There’s something to be said for having the manufacturer’s assembly, though, especially for something as important as this. So, I’d surely try the manufacturer as a first course of action.
Mark, did you just power wash the yellow bars of the ladder? I didn’t catch that in your post above. We have the exact same set and I’m gearing up to rehab it this season.
Hey Nick – I didn’t power wash the bars for my set; I received the entire ladder (both sections/sides) through my warranty… which was really cool. So, the ladders you see above are truly brand new. I’m glad you mentioned this, though – as it’s definitely worth trying. If you get the chance, perhaps you can send before and after pictures to me via the contact page? Those would be great to show here – so everyone can see how the power washing works out. Good luck with your rehab!
Thanks again for the article — I was thrilled to see the same model swingset rehabbed so thoroughly and it helped a lot. We ended up replacing a LOT of wood as well, though since we weren’t the original owners (and didn’t have the warranty at our disposal) we went with pressure treated pine. We replaced all the base support/footers of the two ladders, the slide frame, the swing beam, and all of the floor boards (I found plenty of carpenter ants living in the floor boards). The playground was placed on our sloping backyard years ago, so we actually lowered the upper hill side of the fort by 8 inches to level it (literally just cut the two redwood 6×6 ladder posts by about 8 inches each and recreated the footer/support for that side with PT pine). We also added railing on the downhill side since we were nervous about our young children toppling down through the opening.
I goofed when purchasing the replacement tarp for the roof (I measured it too short). Fortunately not all of my math knowledge escaped me since childhood and I was able to use the Pythagorean theorem to determine how much to cut off the supporting 4×4 beams and then ran a few 2×4 pieces up at each corner to raise the overall roof height by about 8 inches. I think this turned out great (since I didn’t have to buy another tarp) since it makes it less likely for us parents to smack our foreheads on the 1x4s that hold the tarp in place.
The previous owners also had unfortunately used paint in the past, so even with power washing we weren’t able to go with a stain. I let my 3 year old daughter pick the paint color (she threw a bit of pink and blue into the mix) and she and I had a great time tackling the paint project.
We finished off the project by building a border around the play area and filled in with playground chips. All in all it took many days and a lot of labor, but was well worth it.
Hey Nick –
I have to say a few things here:
1) The pink and blue accents are VERY cool — I’m glad you called that out as I didn’t notice it at first glance of your set. Not only does that add a lot of character, but it’s awesome you let your Daughter add to the rehab like that. She’ll remember that forever!
2) The Mulch bed frame-out looks outstanding as well – I find that nuances like that can really make the overall project (in this case your rehab) pop twice as much, and in this case – it definitely does, in my opinion. Very nice.
3) Glad to hear you could make some positive use of the USG “downtime”
And finally…
4) As a part-time Science teacher, I just have to love that you used the Pythagorean theorem so effectively. You get an A… :-)
Thanks so much for posting your finished project here!
I am getting ready to do a rehab on a play system very similar to yours, and the plastic looks about the same as yours did before you revamped it. What product did you use on the plastic?
I hope mine looks as nice as yours does. Nice job!
Hi Rachel – I use Magic Eraser on the plastic surfaces as recommended by my manufacturer. It’s cheap, and you should try it – but depending on how far things have degraded, it can only do so much. In the set you see here, I actually replaced most of the yellow rubberized elements – that’s why they look perfect. But try cleaning first for sure.
Great work! I realize this was posted nearly a year ago, however just want to add my experience (or what soon will be my experience). We bought a used structure very similar to yours and like you said surprises were around every corner. The evening before we arrived for disassembly my wife and I took a look to see if it was something we were interested in and given the extremely low asking price we were all in and wrote a check on the spot. By 9 the next morning, I was in utter panic at the condition of the structure we just bought. I am scheduling time this week to go to the hardware store to get the pieces we need – new footers (old ones rotten to the core), new hardware (rusted to the point of breaking off during disassembly), new canopy, and new swing chains. All tolled, we’ll spend an additional $140.00 over what we paid, however after replacing these items and adding a nice coat of stain we will have saved hundreds, possibly a thousand +, on what we would’ve have spend on a new or mildly used one and it will look just as good. Wouldn’t have done it any other way. Thanks again for sharing.
Thanks, Mick! And even though I did write this about a year ago, people have been buying & building these sets for decades and will surely be doing so for many, many more – so everyone’s insights are really helpful to folks taking this “plunge” for the first time. Sounds like you did GREAT if you got all those replacement parts for $140. Annual redwood swing set maintenance will surely be a must for you as well, of course, but from your summary above – I’m quite sure your set will look awesome for years to come. Enjoy it!!
We are in the process of rehabbing a play set we bought for very little on craigslist. In addition to wood rot, we have also had issues with structural integrity after reassembly. The play set was initially from a reputable company, but after being taken apart and reassembled a few times, (we are beginning to suspect we didn’t purchase it from the original owners), it has a definite wobble comparable to what you get when you take apart cheap assembly required furniture and then try to put it back together again. Some creative hardware fixes have helped a lot and I have no doubt it is safe, but I am afraid it won’t last as long as I’d hoped. In my case it was still worth it for the amount of money we saved, but definitely something to consider.
I like your phrase “creative hardware fixes” – as that really conveys the reality of a play set renovation effort like this. You can definitely save a lot of money (and it sounds like you surely did), but you have to expect the unexpected and roll with it. Thanks, Andrew!
Wow! Now I don’t feel as guilty about not having one of these for my girls as they were growing up. This may not be the part-time job I was hoping for. Really, amortized over 11 years, it’s not that bad. I guess there really IS no free lunch.