When my daughter Ruby went through her first playhouse stage a few years ago when she was five, I did what I always do: I headed over to Amazon to see what there was to see in that department.
Normally, Amazon is a magical repository containing exactly what I need at any given time, returning results that are precisely what I had in mind.
But not so this time: All I found were these teeny-tiny molded plastic playhouses for as much as $300 and an assortment of $600 (Six! Hundred! Dollars!) itty-bitty cedar playhouse kits that the kid would outgrow before I figured out how to assemble it. The only wooden playhouse that looked remotely promising was a $1,600 job that was, at least, big enough to move around in. But I can think of far better uses for that kind of cash.
I quickly saw that there was only one way to do this playhouse thing: Build it my own dang self. How hard can it be, right? It’s just a box with windows.
So I started looking at DIY playhouse plans that you can buy, complete with cut lists and detailed building instructions, but these scrambled my brain. I don’t have the precise carpentry skills and background knowledge needed to construct one of those babies, and I quickly realized that even if I did, all that cedar and fancy-pants hardware added up to a mortgage I wasn’t willing to pay for a backyard playhouse that will probably be abandoned the first time Ruby encounters a spider in there.
I’ve done enough small-scale carpentry through the years to know that anyone can build a simple box with windows—even I, who failed geometry twice in high school. Ruby’s playhouse may not be the squarest playhouse you’ve ever seen, and it may have a few glaring imperfections, but hey. I built it single-handedly for a song, and my kid loves it.
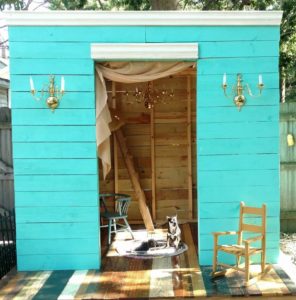
If you’re in the boat I was in, and you’re ready to dispense with over-priced and under-whelming pre-fab playhouses and try your hand at building your kid a custom outdoor playhouse, I hope you find some helpful tips and inspiration in my five-step process.
Step 1: Believe in Yourself
If you’ve never attempted to build anything as ambitious as an outdoor structure, you may have doubts about whether you can pull something like this off. But trust me, it’s really not that complicated, and I went in with some pretty serious limitations. For example, I am not a precise person. In my universe, if it’s within a quarter of an inch, it’s close enough. I also have limited spatial-awareness skills: I can only read a map if I’m facing north, and I have trouble visualizing how things will fit together until I’m actually physically fitting them together. Math is very cumbersome for me, so figuring out the materials I needed was quite a creative process that involved lots of drawings, which I’m also only marginally good at.
But I also have strengths. I’m an excellent problem solver, a real MacGyver. (It’s okay if you have to MacGyver parts of your playhouse.) I’m also a crack researcher, so what I didn’t know, I was able to find and learn online.
When it all boils down, the only skill you really need to build a playhouse is flexibility. Things may not turn out exactly the way you’d envisioned them, and that’s okay. Roll with it. And when in doubt, call in a favor to somebody who can help.
Step 2: Playhouse Dreaming
Since you’re making this playhouse your own dang self, you can design it any way you please. It can be big or small, square or rectangular, sitting on a high platform or a low platform. Get out some graph paper, and sketch some playhouse ideas. Use your (and your kid’s) imagination, and use the Internet for inspiration. But I caution you: If you aren’t a skilled carpenter, you’re gonna want to keep it pretty simple in the end.
I didn’t keep it simple at first. I played around with multiple stories, Arabesque doorways, fire poles, and lofts. I sketched covered porches, climbing walls, and monkey bars.
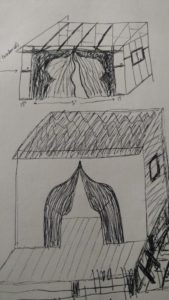
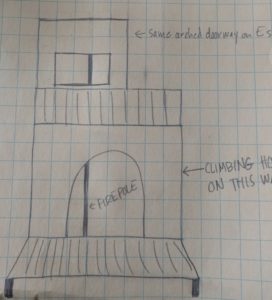
Over two years of intermittent planning, a little research, and numerous reality checks, my sketches worked their way back down to a simple box with windows. I decided I’d just make it a really special box with windows.
While you’re sketching, think ahead to when your kids are much older. What else could the structure be used for? If you think you might want to convert it to a chicken coop or a storage shed down the road, keep that in mind during the designing phase. I’m looking forward to turning Ruby’s house into a potting room when she abandons it.
Step 3: Playhouse Construction Plans
Now it’s time to actually make a blueprint of the house on graph paper that you’ll build from and use to get your lumber list. This is the step where you learn that you have no idea how two walls actually fit together or how to measure an angle. It’s the step where you’ll Google “how to build a simple platform” and watch YouTube videos of a guy framing in a window. By the end of this process, which is quite absorbing and enjoyable, you’ll have a clear path forward.
I started my blueprinting with the platform that the house would be built upon:
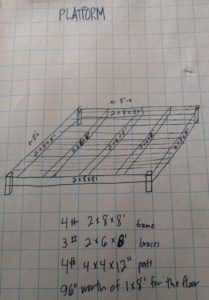
And then I did the front, and back, and sides:
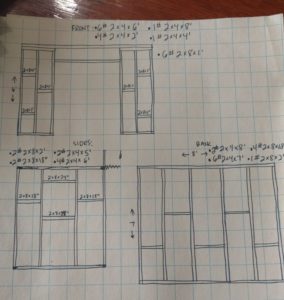
As you make the drawings, visualize yourself putting the house together. When you hit a snag and realize you don’t know how to do something, hit up Google for some help. I ended up not putting the horizontal braces in, because as I later learned, they’re not necessary for such a small structure.
For each drawing, I made a cut list, and then I combined the lists to create a master list and figure out how much lumber I would need. That was a pretty fun math and logic problem, let me tell you.
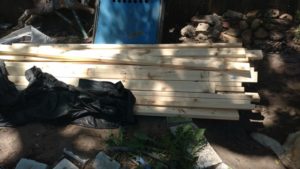
Once I had the cut list, I collected the lumber I needed:
I also gathered all of the tools I was going to use, which were spread all over tarnation, because I tend to leave them where I use them.
Here’s my tool list (with Amazon links for pics and prices):
⦁ A tape measure, of course.
⦁ A torpedo or carpenter’s level.
⦁ Lots of pencils for marking boards.
⦁ A carpenter’s square, even though I don’t know how to read it. It’s handy for sticking in corners to make sure something is square—or in my case, *mostly* square.
⦁ My trusty Campbell Hausfeld air compressor with the nail gun attachment, which sheared off hours and hours of nail pounding from the build time. It has come in very handy for filling many a bike and car tire and putting together trellises for the garden.
⦁ The SKIL drill that I’ve had since college.
⦁ My SKIL circular saw.
⦁ The tabletop miter saw I got at a garage sale for $25. (Sorry – no Amazon link for garage sale miter saws!) I didn’t actually miter much, but rather used it to cut most of my boards, since it’s faster than using a circular saw. A table saw would have been ideal, but I didn’t know that at the time.
⦁ A sturdy set of sawhorses.
⦁ A whole bunch of galvanized screws and the right drill bit.
⦁ One- and two-inch nails for the nail gun.
Once I knew I had everything I needed, I cleared three days from my schedule, took a deep breath, and dug in. It was a thrilling three days, and you’ll hear all about it in my next installment: How to Build a Playhouse Part 2: Framing, Foundation & Roofing.
Or… If you just want to see all of the construction photos right now (from all three installments combined), you can also click though to our Pinterest Playhouse DIY board. If you do, please be sure to follow us there!
And finally, if you’ve also taken on a project similar to this (or are in the middle of one right now) – any additional tips and experiences you can share below??
Need Professional Help from a Local Carpenter?
⦁ Visit Our Find a Contractor Page
Related Posts
⦁ How to Build a Playhouse Part 2: Framing, Foundation & Roofing
⦁ Designing the Perfect Deck
⦁ Hardwood Floor Installation and Trim Work
⦁ Dressing Up an Archway with Fluted Casing and Rosettes
⦁ Building a Removable Wood Fence Section and Gate
⦁ Hall and Stairway Trim Work – Low Maintenance Shadow Boxes

Wow this is fantastic! Appreciate the pep talk as fear is the only thing holding me back from trying this myself. Oh and lack of handy skills. But I’m ok learning as I go. Is Ruby’s beautiful little playhouse weather resistant? How did you keep it dry inside?
Does she still play in it??
I’m looking at your platform design, and during the construction did you seat those 4×4 posts on concrete or are they on the soil? How have they held up for you? I really adore your first photo above – your daughter’s playhouse is truly beautiful.
Thank you, Sandy! Sorry for the late reply—the 4×4 posts are set directly on the soil. It’s pretty hard ground, so I’m hoping they will hold up, and so far they have! The third installment of the playhouse trilogy will be up in a few weeks, so be sure to check back and read it—it’s all about the decking out of the playhouse, and I think you’ll enjoy it!
I love the sconces on the front of your play house, Kristen. At first glance, those jumped right out at me as TOTALLY cool. (And the chandelier inside too!) But that platform you built with the multi-color boards? I never would have conceived of doing that; that’s incredibly creative – and I think it looks particularly awesome!! Was that inspired by something in particular?? I’m definitely looking forward to seeing your construction photos!